#how to define the shape of numpy array
Explore tagged Tumblr posts
Visit Tumblr Blog
Explore Tumblr blogs with no restrictions, modern design and the best experience.
Last Seen Tumblr Blogs


Fun Fact
Tumblr was created by web developers David Karp and Marco Arment.
Text
The Best Open-Source Tools for Data Science in 2025

Data science in 2025 is thriving, driven by a robust ecosystem of open-source tools that empower professionals to extract insights, build predictive models, and deploy data-driven solutions at scale. This year, the landscape is more dynamic than ever, with established favorites and emerging contenders shaping how data scientists work. Here’s an in-depth look at the best open-source tools that are defining data science in 2025.
1. Python: The Universal Language of Data Science
Python remains the cornerstone of data science. Its intuitive syntax, extensive libraries, and active community make it the go-to language for everything from data wrangling to deep learning. Libraries such as NumPy and Pandas streamline numerical computations and data manipulation, while scikit-learn is the gold standard for classical machine learning tasks.
NumPy: Efficient array operations and mathematical functions.
Pandas: Powerful data structures (DataFrames) for cleaning, transforming, and analyzing structured data.
scikit-learn: Comprehensive suite for classification, regression, clustering, and model evaluation.
Python’s popularity is reflected in the 2025 Stack Overflow Developer Survey, with 53% of developers using it for data projects.
2. R and RStudio: Statistical Powerhouses
R continues to shine in academia and industries where statistical rigor is paramount. The RStudio IDE enhances productivity with features for scripting, debugging, and visualization. R’s package ecosystem—especially tidyverse for data manipulation and ggplot2 for visualization—remains unmatched for statistical analysis and custom plotting.
Shiny: Build interactive web applications directly from R.
CRAN: Over 18,000 packages for every conceivable statistical need.
R is favored by 36% of users, especially for advanced analytics and research.
3. Jupyter Notebooks and JupyterLab: Interactive Exploration
Jupyter Notebooks are indispensable for prototyping, sharing, and documenting data science workflows. They support live code (Python, R, Julia, and more), visualizations, and narrative text in a single document. JupyterLab, the next-generation interface, offers enhanced collaboration and modularity.
Over 15 million notebooks hosted as of 2025, with 80% of data analysts using them regularly.
4. Apache Spark: Big Data at Lightning Speed
As data volumes grow, Apache Spark stands out for its ability to process massive datasets rapidly, both in batch and real-time. Spark’s distributed architecture, support for SQL, machine learning (MLlib), and compatibility with Python, R, Scala, and Java make it a staple for big data analytics.
65% increase in Spark adoption since 2023, reflecting its scalability and performance.
5. TensorFlow and PyTorch: Deep Learning Titans
For machine learning and AI, TensorFlow and PyTorch dominate. Both offer flexible APIs for building and training neural networks, with strong community support and integration with cloud platforms.
TensorFlow: Preferred for production-grade models and scalability; used by over 33% of ML professionals.
PyTorch: Valued for its dynamic computation graph and ease of experimentation, especially in research settings.
6. Data Visualization: Plotly, D3.js, and Apache Superset
Effective data storytelling relies on compelling visualizations:
Plotly: Python-based, supports interactive and publication-quality charts; easy for both static and dynamic visualizations.
D3.js: JavaScript library for highly customizable, web-based visualizations; ideal for specialists seeking full control.
Apache Superset: Open-source dashboarding platform for interactive, scalable visual analytics; increasingly adopted for enterprise BI.
Tableau Public, though not fully open-source, is also popular for sharing interactive visualizations with a broad audience.
7. Pandas: The Data Wrangling Workhorse
Pandas remains the backbone of data manipulation in Python, powering up to 90% of data wrangling tasks. Its DataFrame structure simplifies complex operations, making it essential for cleaning, transforming, and analyzing large datasets.
8. Scikit-learn: Machine Learning Made Simple
scikit-learn is the default choice for classical machine learning. Its consistent API, extensive documentation, and wide range of algorithms make it ideal for tasks such as classification, regression, clustering, and model validation.
9. Apache Airflow: Workflow Orchestration
As data pipelines become more complex, Apache Airflow has emerged as the go-to tool for workflow automation and orchestration. Its user-friendly interface and scalability have driven a 35% surge in adoption among data engineers in the past year.
10. MLflow: Model Management and Experiment Tracking
MLflow streamlines the machine learning lifecycle, offering tools for experiment tracking, model packaging, and deployment. Over 60% of ML engineers use MLflow for its integration capabilities and ease of use in production environments.
11. Docker and Kubernetes: Reproducibility and Scalability
Containerization with Docker and orchestration via Kubernetes ensure that data science applications run consistently across environments. These tools are now standard for deploying models and scaling data-driven services in production.
12. Emerging Contenders: Streamlit and More
Streamlit: Rapidly build and deploy interactive data apps with minimal code, gaining popularity for internal dashboards and quick prototypes.
Redash: SQL-based visualization and dashboarding tool, ideal for teams needing quick insights from databases.
Kibana: Real-time data exploration and monitoring, especially for log analytics and anomaly detection.
Conclusion: The Open-Source Advantage in 2025
Open-source tools continue to drive innovation in data science, making advanced analytics accessible, scalable, and collaborative. Mastery of these tools is not just a technical advantage—it’s essential for staying competitive in a rapidly evolving field. Whether you’re a beginner or a seasoned professional, leveraging this ecosystem will unlock new possibilities and accelerate your journey from raw data to actionable insight.
The future of data science is open, and in 2025, these tools are your ticket to building smarter, faster, and more impactful solutions.
#python#r#rstudio#jupyternotebook#jupyterlab#apachespark#tensorflow#pytorch#plotly#d3js#apachesuperset#pandas#scikitlearn#apacheairflow#mlflow#docker#kubernetes#streamlit#redash#kibana#nschool academy#datascience
0 notes
Text
StableHLO & OpenXLA: Enhancing Hardware Portability for ML

JAX and OpenXLA: Methods and Theory
JAX, a Python numerical computing package with pytorch/XLA compilation and automated differentiation, optimises computations for CPUs, GPUs, and TPUs using OpenXLA.
Even though the Intel articles on JAX and OpenXLA do not define StableHLO, the context of OpenXLA's function suggests that it is related to the portability and stability of the Hardware Abstraction Layer (HAL) in the ecosystem. Intel Extension for OpenXLA with PJRT plug-in.
StableHLO likely matches the sources' scenario:
OpenXLA abstracts low-level hardware backends from high-level machine learning frameworks like JAX. This abstraction lets models operate on different hardware without code changes.
OpenXLA uses an intermediate representation (IR) to connect the backend (XLA compilers for specific hardware) and frontend (JAX).
This abstraction requires IR stability to perform properly and enable reliable deployment across devices. This IR change may break backend compilers and frontend frameworks.
We believe StableHLO is an OpenXLA versioned and standardised HLO (High-Level Optimiser) IR. With this standardisation and versioning, models compiled for a StableHLO version would work on compatible hardware backends that support that version.
Although the sources don't define StableHLO, OpenXLA's role as an abstraction layer with an intermediate representation implies that it's essential to the JAX and OpenXLA ecosystem for ensuring computation stability and portability across hardware targets. Hardware and software (JAX via OpenXLA) would have a solid contract.
To better understand StableHLO, you should read OpenXLA project and component documentation.
Understanding how JAX and OpenXLA interact, especially the compilation and execution cycle, helps Intel and other systems optimise performance. OpenXLA's role in backend-agnostic optimisation, JAX's staged compilation, and cross-device execution are highlighted.
Important topics
Core Functionality and Transformation System of JAX
JIT compilation, vectorisation, parallelisation, and automated differentiation (jax.grad) are added to NumPy by JAX.
These changes make JAX functions more efficient.
Jax.jit converts JAX functions into XLA computations, improving efficiency. “The jax.jit transformation in JAX optimises numerical computations by compiling Python functions that operate on JAX arrays into efficient, hardware-accelerated code using XLA.”
OpenXLA as a Backend-Agnostic Compiler
OpenXLA bridges hardware backends to JAX. The optimisation and intermediate representation pipeline is combined.
The jax.jit converter converts JAX code to OpenXLA HLO IR.
OpenXLA optimises this HLO IR and generates backend machine code.
“OpenXLA serves as a unifying compiler infrastructure that produces optimised machine code for CPUs, GPUs, and TPUs from JAX's computation graph in HLO.”
Compilation in stages in JAX
JAX-decorated functions employ staged compilation.Invoking jit requires a specified input shape and data type (abstract signature).
JAX watches the Python function's execution using abstract variables to describe the calculation.
This traced calculation then reaches the OpenXLA HLO IR.
OpenXLA optimises the HLO and generates target backend code.
Using the resulting code in subsequent calls with the same abstract signature will boost performance. “When a JAX-jitted function is called for the first time with a specific shape and dtype of inputs, JAX traces the sequence of operations, and OpenXLA compiles this computation graph into optimised machine code for the target device.”
CPU and GPU Execution Flow
How OpenXLA lets JAX regulate device computations.
OpenXLA optimises CPU machine code using SIMD and other architectural features.
In OpenXLA, data flows and kernel execution are maintained while the GPU handles calculations.
On GPUs, OpenXLA generates kernels for the GPU's parallel processing units.
This includes initiating and coordinating GPU kernels and managing CPU-GPU memory transfers.
Data management between devices using device buffers (jax.device_buffer.DeviceArray).
Understanding Abstract Signatures and Recompilation
The form and data type of input arguments determine a jax.jit-decorated function's abstract signature.
When a jitted function is called with inputs with a different abstract signature, JAX recompiles. Use consistent input shapes and data types to save compilation costs.
Intel Hardware/Software Optimisation Integration
Since the resources are on the Intel developer website, they likely demonstrate how JAX and OpenXLA may optimise Intel CPUs and GPUs.
This area includes optimised kernels, vectorisation on Intel architectures like AVX-512, and interaction with Intel-specific libraries or tools.
The jax.jit transformation in JAX employs XLA to turn Python functions that operate with JAX arrays into hardware-accelerated code, optimising numerical operations.
OpenXLA serves as a unified compiler infrastructure, converting JAX's compute graph (HLO) into optimised machine code for CPUs, GPUs, and TPUs.
When JAX-jitted functions are initially performed with a specific shape and dtype of inputs, JAX tracks the chain of operations. OpenXLA then compiles this processing graph into device-optimized machine code.
OpenXLA targets GPUs to generate kernels for the GPU's parallel processing units. Launching and synchronising GPU kernels and managing CPU-GPU data flows are required.
#technology#technews#govindhtech#news#technologynews#AI#artificial intelligence#StableHLO#OpenXLA#HLO#JAX#OpenXLA HLO#JAX and OpenXLA
0 notes
Text
Python: The Versatile Programming Language You Need to Learn
Introduction
Python has become one of the most popular programming languages in the world, and for good reason. Its simplicity, versatility, and powerful capabilities make it an ideal choice for both beginners and experienced developers. From web development to data science and artificial intelligence, Python is everywhere, shaping the future of technology. At TechnoComet Solutions, we leverage Python’s power to build innovative solutions for our clients. With a robust ecosystem of libraries and frameworks, Python continues to drive advancements across industries. As technology evolves, Python’s role in emerging fields like AI, machine learning, and automation becomes even more critical.
A Brief History of Python: From Simplicity to Power
Python was created in the late 1980s by Guido van Rossum and was first released in 1991. Its design philosophy emphasizes code readability and simplicity, making it accessible for beginners while powerful enough for experts. Over the years, Python has evolved significantly, gaining a vast array of libraries and frameworks that extend its capabilities into various domains, including web development, data science, artificial intelligence (AI), and more. This growth has solidified Python’s position as one of the most popular programming languages in the world.
The language’s ongoing development is driven by a community of dedicated contributors who continually enhance its features. As a result, Python remains relevant in an ever-changing technological landscape, adapting to new challenges and opportunities.
The Popularity Surge: Why Python is Everywhere
The surge in Python’s popularity can be attributed to several factors. First, its clean and readable syntax allows developers to express concepts in fewer lines of code compared to other languages. This simplicity not only makes it easier for newcomers to learn but also enhances productivity for experienced developers. Second, Python’s extensive ecosystem of libraries—such as NumPy for numerical computations and Pandas for data manipulation—enables rapid development across various fields.
Additionally, the rise of data science and AI has further propelled Python into the spotlight, as it is often the language of choice for machine learning applications. The growing number of online courses and tutorials has also made learning Python more accessible than ever before. This accessibility has contributed to a vibrant community that shares knowledge and resources.
Understanding Python’s Core Features
Clean and Readable Syntax: Making Programming Accessible for Beginners
One of Python’s standout features is its clean syntax, which resembles natural language. This design choice reduces the cognitive load on programmers, allowing them to focus on solving problems rather than deciphering complex syntax. The use of indentation to define code blocks instead of braces or keywords also contributes to its readability. This clarity helps beginners grasp programming concepts quickly without feeling overwhelmed. As they progress, they can appreciate how this simplicity leads to more maintainable code in larger projects. Ultimately, this focus on readability fosters a culture of collaboration among developers.
Dynamically Typed: What It Means for Flexibility in Development
Python is dynamically typed, meaning that variable types are determined at runtime rather than in advance. This flexibility allows developers to write code more quickly and adaptively, as they do not need to declare variable types explicitly. However, this feature can also lead to runtime errors if not managed carefully. Developers must be vigilant about ensuring their code behaves as expected since type-related errors may not surface until execution time. Despite this potential pitfall, many find that the benefits of dynamic typing outweigh the drawbacks. This adaptability encourages experimentation and innovation in coding practices.
Applications of Python: From Web Development to AI
Python in Web Development: Frameworks, Libraries, and Tools
Python’s versatility shines in web development through frameworks like Django and Flask. Django is a high-level framework that encourages rapid development and clean design by providing built-in features such as authentication and database management. Flask, on the other hand, is a micro-framework that offers flexibility for smaller applications or services where developers want more control over components. Both frameworks have strong communities that contribute plugins and extensions to enhance functionality. With these tools at their disposal, developers can create robust web applications efficiently while focusing on delivering value to users. This capability allows businesses to launch products faster and respond quickly to market demands.
Unlocking the Power of Python in Data Science and Machine Learning
In data science and machine learning, Python is unmatched due to its rich ecosystem of libraries. Tools like Pandas facilitate data manipulation and analysis, while Scikit-learn provides simple yet effective tools for predictive data analysis. For deep learning applications, libraries like TensorFlow and Keras enable developers to create complex neural networks with ease. The integration of these libraries allows data scientists to streamline workflows from data collection to model deployment seamlessly. As a result, professionals can uncover insights faster than ever before while maintaining high accuracy levels in their predictions.
Why Python is Ideal for Beginners
Easy to Learn, Easy to Master: The Learning Curve of Python
Python’s straightforward syntax makes it an excellent choice for beginners. New programmers can start writing simple scripts within minutes, while more advanced concepts can be mastered over time. This gradual learning curve encourages continuous engagement with programming; learners can build confidence as they tackle progressively challenging projects. Many educational institutions have adopted Python as their primary teaching language due to its accessibility. This trend further reinforces its status as a go-to language for aspiring programmers who want a solid foundation in coding principles.
A Friendly Ecosystem: Python’s Extensive Documentation and Support
The Python community is vast and welcoming, providing extensive documentation and support through forums like Stack Overflow and GitHub. This community-driven approach means that beginners can easily find resources and assistance as they learn. Additionally, numerous online courses cater specifically to newcomers looking to build their skills at their own pace. With countless tutorials available across platforms like YouTube or Coursera, learners have no shortage of options when seeking help or guidance. This supportive environment fosters collaboration among learners at all stages.
The Rich Ecosystem of Python Libraries and Frameworks
Exploring Popular Python Libraries: Pandas, NumPy, Matplotlib, and More
Python offers a rich ecosystem of libraries that simplify complex tasks. Pandas is ideal for data manipulation, while NumPy supports numerical computing with arrays and matrices. For data visualization, Matplotlib enables the creation of a wide range of graphs and charts. SciPy provides essential tools for scientific computing. These libraries save developers time by offering pre-built solutions, and their regular updates ensure access to the latest features, enhancing Python’s capabilities for diverse applications. With such a robust set of tools, Python’s remains a top choice for developers working across various industries.
Python Frameworks: Django and Flask for Web Development
As mentioned earlier, Django provides a robust framework for building web applications quickly with built-in features, while Flask offers simplicity and flexibility for smaller projects. Both frameworks have strong communities that contribute plugins and extensions to enhance functionality. Developers can choose between these frameworks based on their project requirements—whether they need a full-fledged solution or prefer a lightweight option tailored to specific needs. This adaptability makes Python an attractive choice for various web development scenarios where speed and efficiency are crucial.
Advanced Python: Beyond the Basics
Object-Oriented Programming in Python: Creating Scalable and Reusable Code
Python supports object-oriented programming (OOP) principles such as encapsulation, inheritance, and polymorphism. This approach enables developers to create scalable applications by organizing code into reusable classes and objects. OOP helps manage complexity by breaking down programs into smaller components that are easier to understand and maintain over time. By utilizing these principles effectively, developers can build software systems that are both efficient and adaptable to changing requirements while promoting code reuse across projects.
Python for Data Analysis and Visualization: Unlocking Insights from Data
Data analysis in Python is made easy with libraries like Pandas for data manipulation combined with Matplotlib or Seaborn for visualization. This combination allows analysts to extract meaningful insights from complex datasets efficiently while presenting findings clearly through visual storytelling techniques. With powerful visualization tools at their disposal, professionals can present their findings clearly and compellingly—making it easier for stakeholders to understand key trends or patterns in the data while facilitating informed decision-making processes across various industries.
The Future of Python: Why Learning Python is an Investment in Your Career
Python’s Role in Emerging Technologies: AI, IoT, and Cloud Computing
As technology evolves, so does the role of Python. It plays a significant part in emerging fields such as AI, where its libraries facilitate machine learning model development alongside automation tasks across industries like finance or healthcare. Additionally, with the rise of the Internet of Things (IoT) and cloud computing platforms like AWS or Azure supporting Python’s ‘applications, the language continues to be relevant in diverse contexts today. As businesses increasingly adopt these technologies into their operations, having proficiency in Python’s will be crucial for staying competitive in the job market—and opens doors to exciting career opportunities.
High Demand for Python Developers in the Job Market
The demand for skilled Python developers remains high across various industries due to its versatility across multiple domains such as web development or scientific computing applications alike; this demand shows no signs of slowing down anytime soon! Companies are increasingly looking for professionals who can leverage Python’s capabilities in web development, data analysis, automation, and AI solutions effectively within teams striving towards innovation goals together! According to recent job market trends indicating positions requiring knowledge of Python’s consistently rank among the most sought-after roles in tech today—indicating a bright future ahead for those who invest time into mastering this powerful language.
Conclusion
In conclusion, learning Python opens up numerous opportunities across diverse fields—from web development to artificial intelligence—it truly offers something valuable regardless if you’re just starting out or already have experience under your belt! Its clean syntax makes it accessible for beginners while offering powerful features that cater specifically towards advanced developers seeking greater challenges ahead! With a rich ecosystem filled with libraries and frameworks supporting various applications available at your fingertips, mastering Python isn’t just an investment in your skills but also serves as a strategic move within today’s rapidly evolving job market landscape!
Are you ready to elevate your programming skills? At TechnoComet Solutions, we recognize the value of mastering versatile languages like Python. Join us today and unlock a world of opportunities that Python can offer for your career and IT services!
Read More: Click Here
0 notes
Text
youtube
Python Numpy Tutorials
#numpy tutorials#numpy for beginners#numpy arrays#what is array in numpy#numpy full array#how to create numpy full array#what is numpy full array#how to use numpy full array#uses of numpy full array#how to define the shape of numpy array#python for beginners#python full course#numpy full course#numpy python playlist#numpy playlist#complete python numpy tutorials#numpy full array function#python array#python numpy library#how to create arrays in python numpy#Youtube
0 notes
Text
Master NumPy Library for Data Analysis in Python in 10 Minutes
Learn and Become a Master of one of the most used Python tools for Data Analysis.

Introduction:-
NumPy is a python library used for working with arrays.It also has functions for working in domain of linear algebra, fourier transform, and matrices.It is an open source project and you can use it freely. NumPy stands for Numerical Python.
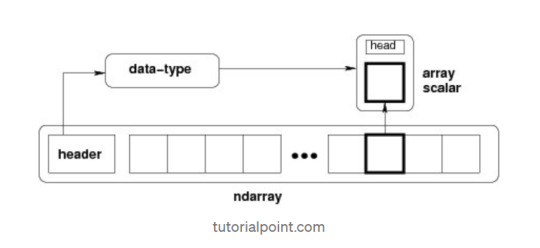
NumPy — Ndarray Object
The most important object defined in NumPy is an N-dimensional array type called ndarray. It describes the collection of items of the same type. Items in the collection can be accessed using a zero-based index.Every item in an ndarray takes the same size of block in the memory.
Each element in ndarray is an object of data-type object (called dtype).Any item extracted from ndarray object (by slicing) is represented by a Python object of one of array scalar types.
The following diagram shows a relationship between ndarray, data type object (dtype) and array scalar type −
It creates an ndarray from any object exposing array interface, or from any method that returns an array.
numpy.array(object, dtype = None, copy = True, order = None, subok = False, ndmin = 0)
The above constructor takes the following parameters −
Object :- Any object exposing the array interface method returns an array, or any (nested) sequence.
Dtype : — Desired data type of array, optional.
Copy :- Optional. By default (true), the object is copied.
Order :- C (row major) or F (column major) or A (any) (default).
Subok :- By default, returned array forced to be a base class array. If true, sub-classes passed through.
ndmin :- Specifies minimum dimensions of resultant array.
Operations on Numpy Array
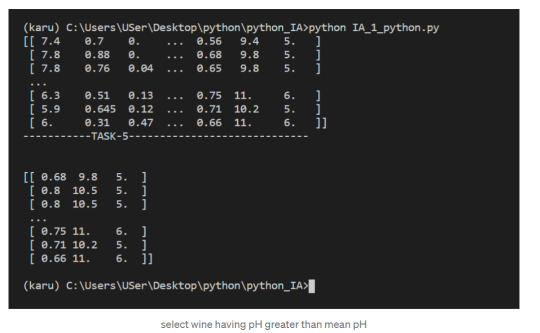
In this blog, we’ll walk through using NumPy to analyze data on wine quality. The data contains information on various attributes of wines, such as pH and fixed acidity, along with a quality score between 0 and 10 for each wine. The quality score is the average of at least 3 human taste testers. As we learn how to work with NumPy, we’ll try to figure out more about the perceived quality of wine.
The data was downloaded from the winequality-red.csv, and is available here. file, which we’ll be using throughout this tutorial:
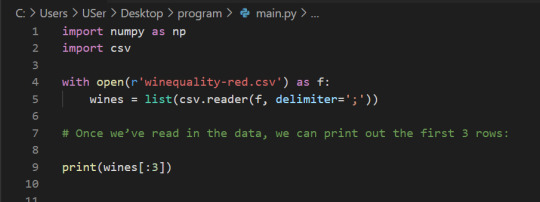
Lists Of Lists for CSV Data
Before using NumPy, we’ll first try to work with the data using Python and the csv package. We can read in the file using the csv.reader object, which will allow us to read in and split up all the content from the ssv file.
In the below code, we:
Import the csv library.
Open the winequality-red.csv file.
With the file open, create a new csv.reader object.
Pass in the keyword argument delimiter=";" to make sure that the records are split up on the semicolon character instead of the default comma character.
Call the list type to get all the rows from the file.
Assign the result to wines.

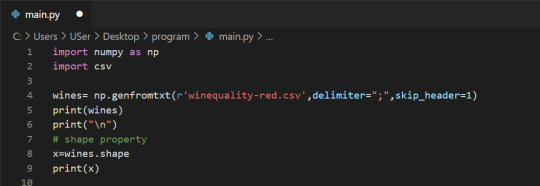
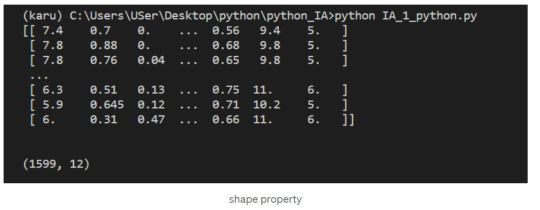
We can check the number of rows and columns in our data using the shape property of NumPy arrays:
Indexing NumPy Arrays
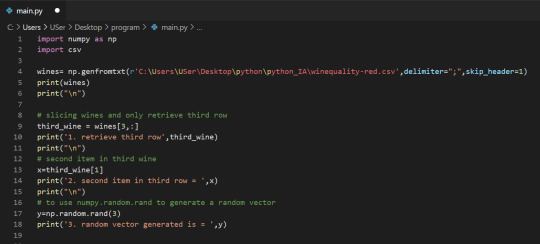
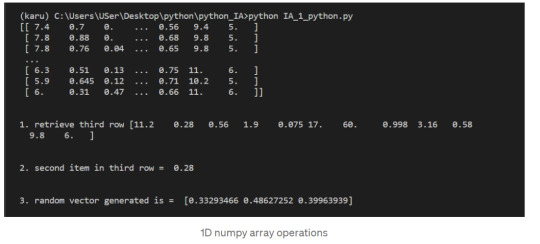
Let’s select the element at row 3 and column 4. In the below code, we pass in the index 2 as the row index, and the index 3 as the column index. This retrieves the value from the fourth column of the third row:

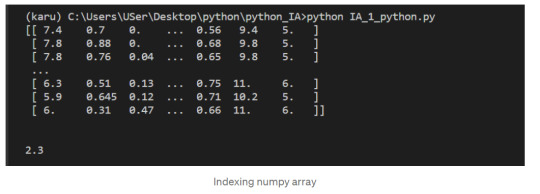
1-Dimensional NumPy Arrays
So far, we’ve worked with 2-dimensional arrays, such as wines. However, NumPy is a package for working with multidimensional arrays. One of the most common types of multidimensional arrays is the 1-dimensional array, or vector.
1.Just like a list of lists is analogous to a 2-dimensional array, a single list is analogous to a 1-dimensional array. If we slice wines and only retrieve the third row, we get a 1-dimensional array:
2. We can retrieve individual elements from third_wine using a single index. The below code will display the second item in third_wine:
3. Most NumPy functions that we’ve worked with, such as numpy.random.rand, can be used with multidimensional arrays. Here’s how we’d use numpy.random.rand to generate a random vector:
After successfully reading our dataset and learning about List, Indexing, & 1D array in NumPy we can start performing the operation on it.
The first element of each row is the fixed acidity, the second is the volatile ,acidity, and so on. We can find the average quality of the wines. The below code will:
Extract the last element from each row after the header row.
Convert each extracted element to a float.
Assign all the extracted elements to the list qualities.
Divide the sum of all the elements in qualities by the total number of elements in qualities to the get the mean.
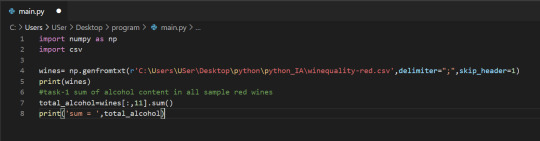
NumPy Array Methods
In addition to the common mathematical operations, NumPy also has several methods that you can use for more complex calculations on arrays. An example of this is the numpy.ndarray.sum method. This finds the sum of all the elements in an array by default:
2. Sum of alcohol content in all sample red wines

NumPy Array Comparisons
We get a Boolean array that tells us which of the wines have a quality rating greater than 5. We can do something similar with the other operators. For instance, we can see if any wines have a quality rating equal to 10:
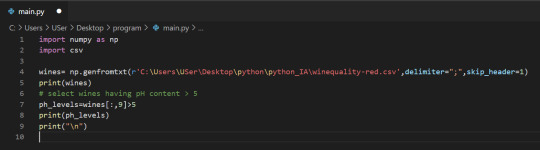
3. select wines having pH content > 5
Subsetting
We select only the rows where high_Quality contains a True value, and all of the columns. This subsetting makes it simple to filter arrays for certain criteria. For example, we can look for wines with a lot of alcohol and high quality. In order to specify multiple conditions, we have to place each condition in parentheses, and separate conditions with an ampersand (&):
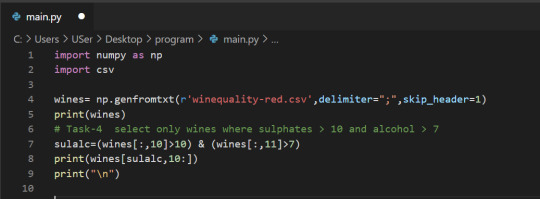
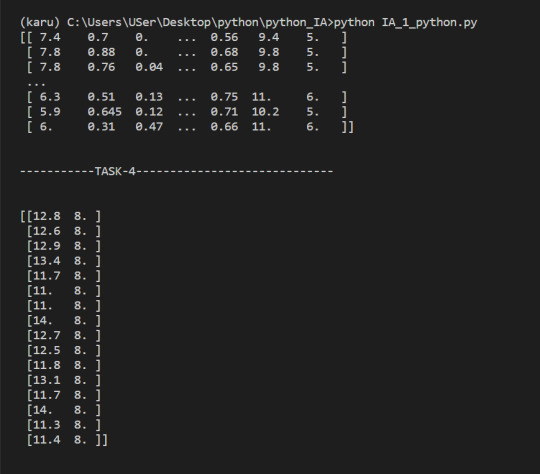
4. Select only wines where sulphates >10 and alcohol >7
5. select wine having pH greater than mean pH
We have seen what NumPy is, and some of its most basic uses. In the following posts we will see more complex functionalities and dig deeper into the workings of this fantastic library!
To check it out follow me on tumblr, and stay tuned!
That is all, I hope you liked the post. Feel Free to follow me on tumblr
Also, you can take a look at my other posts on Data Science and Machine Learning here. Have a good read!
1 note
·
View note
Text
Running a Random Forest
Hey guy’s welcome back in previous blog we have seen that, how to run classification trees in python you can check it here. In this blog you are going to learn how to run Random Forest using python.
So now let's see how to generate a random forest with Python. Again, I'm going to use the Wave One, Add Health Survey that I have data managed for the purpose of growing decision trees. You'll recall that there are several variables. Again, we'll define the response or target variable, regular smoking, based on answers to the question, have you ever smoked cigarettes regularly? That is, at least one cigarette every day for 30 days.

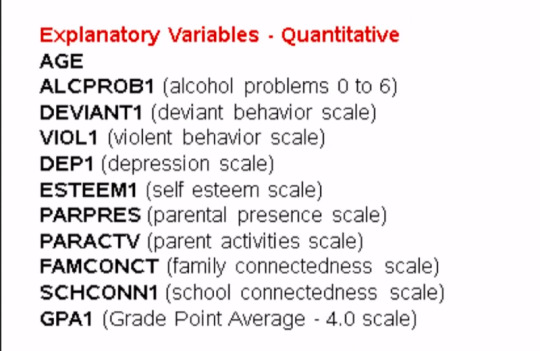
The candidate explanatory variables include gender, race, alcohol, marijuana, cocaine, or inhalant use. Availability of cigarettes in the home, whether or not either parent was on public assistance, any experience with being expelled from school, age, alcohol problems, deviance, violence, depression, self esteem, parental presence, activities with parents family and school connectedness and grade point average.
Much of the code that we'll write for our random forest will be quite similar to the code we had written for individual decision trees.
First there are a number of libraries that we need to call in, including features from the sklearn library.
from pandas import Series, DataFrame import pandas as pd import numpy as np import os import matplotlib.pylab as plt from sklearn.cross_validation import train_test_split from sklearn.tree import DecisionTreeClassifier from sklearn.metrics import classification_report import sklearn.metrics # Feature Importance from sklearn import datasets from sklearn.ensemble import ExtraTreesClassifier
Next I'm going to use the change working directory function from the OS library to indicate where my data set is located.
os.chdir("C:\TREES")
Next I'll load my data set called tree_addhealth.csv. because decision tree analyses cannot handle any NAs in our data set, my next step is to create a clean data frame that drops all NAs. Setting the new data frame called data_clean I can now take a look at various characteristics of my data, by using the D types and describe functions to examine data types and summary statistics.
#Load the dataset
AH_data = pd.read_csv("tree_addhealth.csv") data_clean = AH_data.dropna()
data_clean.dtypes data_clean.describe()
Next I set my explanatory and response, or target variables, and then include the train test split function for predictors and target. And set the size ratio to 60% for the training sample, and 40% for the test sample by indicating test_size=.4.
#Split into training and testing sets
predictors = data_clean[['BIO_SEX','HISPANIC','WHITE','BLACK','NAMERICAN','ASIAN','age', 'ALCEVR1','ALCPROBS1','marever1','cocever1','inhever1','cigavail','DEP1','ESTEEM1','VIOL1', 'PASSIST','DEVIANT1','SCHCONN1','GPA1','EXPEL1','FAMCONCT','PARACTV','PARPRES']]
targets = data_clean.TREG1
Here I request the shape of these predictor and target and training test samples.
pred_train.shape pred_test.shape tar_train.shape tar_test.shape
From sklearn.ensamble I import the RandomForestClassifier
#Build model on training data from sklearn.ensemble import RandomForestClassifier
Now that training and test data sets have already been created, we'll initialize the random forest classifier from SK Learn and indicate n_estimators=25. n_estimators are the number of trees you would build with the random forest algorithm.
classifier=RandomForestClassifier(n_estimators=25)
Next I actually fit the model with the classifier.fit function which we passed the training predictors and training targets too.
classifier=classifier.fit(pred_train,tar_train)
Then, we go unto the prediction on the testator set. And we could also similar to decision tree code as for the confusion matrix and accuracy scores.
predictions=classifier.predict(pred_test)
sklearn.metrics.confusion_matrix(tar_test,predictions) sklearn.metrics.accuracy_score(tar_test, predictions)

For the confusion matrix, we see the true negatives and true positives on the diagonal. And the 207 and the 82 represent the false negatives and false positives, respectively. Notice that the overall accuracy for the forest is 0.84. So 84% of the individuals were classified correctly, as regular smokers, or not regular smokers.
Given that we don't interpret individual trees in a random forest, the most helpful information to be gotten from a forest is arguably the measured importance for each explanatory variable. Also called the features. Based on how many votes or splits each has produced in the 25 tree ensemble. To generate importance scores, we initialize the extra tree classifier, and then fit a model. Finally, we ask Python to print the feature importance scores calculated from the forest of trees that we've grown.
# fit an Extra Trees model to the data model = ExtraTreesClassifier() model.fit(pred_train,tar_train) # display the relative importance of each attribute print(model.feature_importances_)
The variables are listed in the order they've been named earlier in the code. Starting with gender, called BIO_SEX, and ending with parental presence. As we can see the variables with the highest important score at 0.13 is marijuana use. And the variable with the lowest important score is Asian ethnicity at .006.

As you will recall, the correct classification rate for the random forest was 84%. So were 25 trees actually needed to get this correct rate of classification? To determine what growing larger number of trees has brought us in terms of correct classification. We're going to use code that builds for us different numbers of trees, from one to 25, and provides the correct classification rate for each. This code will build for us random forest classifier from one to 25, and then finding the accuracy score for each of those trees from one to 25, and storing it in an array. This will give me 25 different accuracy values. And we'll plot them as the number of trees increase.
""" Running a different number of trees and see the effect of that on the accuracy of the prediction """
trees=range(25) accuracy=np.zeros(25)
for idx in range(len(trees)): classifier=RandomForestClassifier(n_estimators=idx + 1) classifier=classifier.fit(pred_train,tar_train) predictions=classifier.predict(pred_test) accuracy[idx]=sklearn.metrics.accuracy_score(tar_test, predictions)
plt.cla() plt.plot(trees, accuracy)
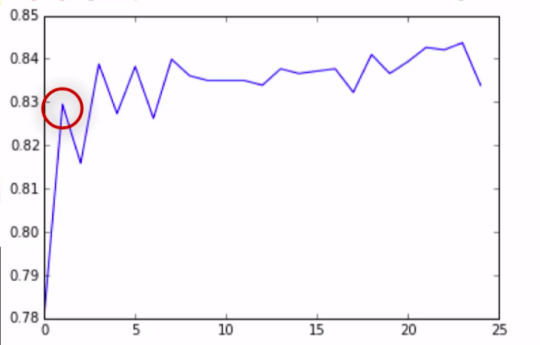
As you can see, with only one tree the accuracy is about 83%, and it climbs to only about 84% with successive trees that are grown giving us some confidence that it may be perfectly appropriate to interpret a single decision tree for this data. Given that it's accuracy is quite near that of successive trees in the forest.
To summarize, like decision trees, random forests are a type of data mining algorithm that can select from among a large number of variables. Those that are most important in determining the target or response variable to be explained.
Also light decision trees. The target variable in a random forest can be categorical or quantitative. And the group of explanatory variables or features can be categorical and quantitative in any combination. Unlike decision trees however, the results of random forests often generalize well to new data.
Since the strongest signals are able to emerge through the growing of many trees. Further, small changes in the data do not impact the results of a random forest. In my opinion, the main weakness of random forests is simply that the results are less satisfying, since no trees are actually interpreted. Instead, the forest of trees is used to rank the importance of variables in predicting the target.
Thus we get a sense of the most important predictive variables but not necessarily their relationships to one another.
Complete Code
from pandas import Series, DataFrame import pandas as pd import numpy as np import os import matplotlib.pylab as plt from sklearn.cross_validation import train_test_split from sklearn.tree import DecisionTreeClassifier from sklearn.metrics import classification_report import sklearn.metrics # Feature Importance from sklearn import datasets from sklearn.ensemble import ExtraTreesClassifier
os.chdir("C:\TREES")
#Load the dataset
AH_data = pd.read_csv("tree_addhealth.csv") data_clean = AH_data.dropna()
data_clean.dtypes data_clean.describe()
#Split into training and testing sets
predictors = data_clean[['BIO_SEX','HISPANIC','WHITE','BLACK','NAMERICAN','ASIAN','age', 'ALCEVR1','ALCPROBS1','marever1','cocever1','inhever1','cigavail','DEP1','ESTEEM1','VIOL1', 'PASSIST','DEVIANT1','SCHCONN1','GPA1','EXPEL1','FAMCONCT','PARACTV','PARPRES']]
targets = data_clean.TREG1
pred_train, pred_test, tar_train, tar_test = train_test_split(predictors, targets, test_size=.4)
pred_train.shape pred_test.shape tar_train.shape tar_test.shape
#Build model on training data from sklearn.ensemble import RandomForestClassifier
classifier=RandomForestClassifier(n_estimators=25) classifier=classifier.fit(pred_train,tar_train)
predictions=classifier.predict(pred_test)
sklearn.metrics.confusion_matrix(tar_test,predictions) sklearn.metrics.accuracy_score(tar_test, predictions)
# fit an Extra Trees model to the data model = ExtraTreesClassifier() model.fit(pred_train,tar_train) # display the relative importance of each attribute print(model.feature_importances_)
""" Running a different number of trees and see the effect of that on the accuracy of the prediction """
trees=range(25) accuracy=np.zeros(25)
for idx in range(len(trees)): classifier=RandomForestClassifier(n_estimators=idx + 1) classifier=classifier.fit(pred_train,tar_train) predictions=classifier.predict(pred_test) accuracy[idx]=sklearn.metrics.accuracy_score(tar_test, predictions)
plt.cla() plt.plot(trees, accuracy)
If you are still here, I appreciate that, and see you guy’s next time. ✌️
1 note
·
View note
Text
NUMPY ARRAY
Python includes a large number of libraries that may be used to execute a variety of tasks. The libraries are organized into groups based on the task at hand. Python is a fantastic programming language that provides the ideal environment for doing various scientific and mathematical calculations. Numpy, a popular Python library, is an example of such a library. It's a Python-based open-source toolkit for conducting computations in the engineering and scientific domains.
Numpy is a Python package that contains multidimensional arrays and matrix data structures. The ndarray object is a homogenous array object provided by the library. In Python, the Numpy array has the shape of an n-dimensional array. There are also other methods in the library that can be used to execute operations on the array. The library may be used to execute a variety of mathematical operations on the array as well. Python can be enhanced with data structures that will allow for the efficient calculation of various matrices and arrays. The library also includes a number of mathematical functions that can be used to manipulate matrices and arrays.
The library's installation and import
A Python distribution of scientific origin should be used to install Numpy in Python. The library may be installed with the following command if the machine already has Python installed.
Numpy can be installed with Conda or by using the pip command.
Anaconda, which is one of the easiest ways to install Python, can be used if it hasn't been installed yet on the machine. Other libraries or packages, such as SciPy, Numpy, Scikit-learn, pandas, and others, do not need to be installed individually when installing Anaconda.
The command import Numpy as np can be used to import the Numpy library into Python.
The module includes numerous methods for quickly and efficiently creating arrays in Python. It also allows you to change the data within the arrays or modify the arrays themselves. The distinction between a list and a Numpy array in Python is that the data in a Python list can be of different data types, whereas the items in a Numpy array in Python should be homogeneous. Within the Numpy array, the items have the same data types. The mathematical functions that could be applied over the Numpy array would become inefficient if the elements in the Numpy array were of different data types.
Python Numpy Array
Within the Numpy library, the Numpy array is a centralized data structure. When an array is defined, it is made up of arrays that are arranged in a grid and hold raw data information. It also offers instructions on how to locate an element in an array and how to interpret an element in an array. The Numpy array is made up of grid elements that can be indexed in a variety of ways. The array's elements all have the same data type, hence they're referred to as array dtype.
· The array's index is determined by a tuple of non-negative integers. Integers, Booleans, and other arrays can also be used to index it.
· The dimension number of an array is used to determine its rank.
· An array's form is defined as the set of numbers that specify the array's size in each dimension.
· For high-dimensional data, a Python list with nested lists can be used to initialize the arrays.
· Square brackets can be used to access the items of the array. The indexing of the Numpy array always starts with 0, therefore when accessing the elements, the array's first element will be at the 0 position.
The Numpy array's basic operations
· In Python, the function np.array() is used to create a Numpy array. The user must first generate an array before passing it to a list. In the list, the user can also specify the data type.
· In Python, the function np.sort() can be used to sort a Numpy array. When the function is invoked, the user can define the kind, axis, and order.
· Users can use ndarray.ndim to retrieve information about the array's dimensions or axis number. Using ndarray.size also informs the user of the total number of elements in the array.
· Arrays in Numpy can be indexed and sliced in the same manner that lists in Python can.
· The sign "+" can be used to join two arrays together. Additionally, the sum() function can be used to return the sum of all the entries in an array. The function can be applied to arrays with one, two, or even three dimensions.
· Operations can be carried out over arrays of various forms using the idea of broadcasting in a Numpy array. The array dimensions, however, must be compatible; otherwise, the application will throw a ValueError.
0 notes
Text
My Programming Journey: Machine Learning using Python
After learning how to code in SAIT I decided I wanted to take things to the next level with my programming skills and try Machine Learning by myself, given that Artificial Intelligence has always been a really intriguing topic for me and I like a good old challenge to improve, grow and, most importantly, learn new things.
A lot is said about Machine Learning, but we can define it as algorithms that gather/analyze data and learn automatically through experience without being programmed to do so. The learning is done by identifying patterns and making decisions or predictions based on the data.
ML is not a new technology but recently has been growing rapidly and being used in everyday life. Examples that we are all familiar with are:
-Predictions in Search Engines
-Content recommendations from stream services or social media platforms
-Spam detection in emails
-Self-driving cars
-Virtual assistants
The Importance of Machine Learning
The vast amount of data available and processing power in modern technology makes it the perfect environment to train machine-learning models and by building precise models an organization can make better decisions. Most industries that deal with big data recognize the value of ML technology. In the health care industry, this technology has made it easier to diagnose patients, provide treatment plans and even perform precision surgeries. Government agencies and financial services also benefit from machine-learning since they deal with large amounts of data. This data is often used for insights and security, like preventing identity theft and fraud.
Other things like speech and language recognition, facial recognition for surveillance, transcription and translation of speech and computer vision are all thanks to machine learning, and the list goes on.
Types of Machine Learning
Usually, machine learning is divided into three categories: supervised learning, unsupervised learning and reinforcement learning.
Supervised learning
For this approach, machines are exposed to labelled data and learn by example. The algorithm receives a set of inputs with the correct outputs and learns by comparing its output with the correct output and modify the model as needed. The most common supervised learning algorithms are classification, regression and artificial neural networks.
Unsupervised learning
Unlike the previous approach, the unsupervised learning method takes unlabelled data so that the algorithm can identify patterns in data. Popular algorithms include nearest-neighbor mapping and k-means clustering.
Reinforcement learning
This approach consists of the algorithm interacting with the environment to find the actions that give the biggest rewards as feedback.
Iris Flower Classification Project
The iris flower problem is the “Hello World” of machine learning.

Iris flowers in Vancouver Park by Kevin Castel in Unsplash - https://unsplash.com/photos/y4xISRK8TUg
I felt tempted to try a machine learning project that I knew was too advanced for me and flex a little or fail miserably, but I decided to start with this iconic project instead. The project consists of classifying iris flowers among three species from measurements of sepals and petals’ length and width. The iris dataset contains 3 classes of 50 instances each, with classes referring to a type of iris flower.
Before Starting the Project
For this project, and for the rest of my machine learning journey, I decided to install Anaconda (Python 3.8 distribution), a package management service that comes with the best python libraries for data science and with many editors, including Visual Studio Code, the editor I will be using for this demonstration.
You can get Anaconda here: https://repo.anaconda.com/archive/Anaconda3-2021.05-Windows-x86_64.exe
I find that Anaconda makes it easy to access Python environments and it contains a lot of other programs to code and practice, as well as nice tutorials to get acquainted with the software.
In the following videos, I will be going step by step on the development of this project:
youtube
youtube
If videos aren't your thing, the readable step-by-step instructions are here in the post:
Prior to this project, I already had Visual Studio Code installed on my computer since I had used it for previous semesters. From VSCode I installed Python and then I selected a Python interpreter. The Python interpreter I will use is Anaconda, because it has all the dependencies I need for coding.
Getting Started
I configured Visual Studio Code to be able to develop in Python, then I created a python file named ml-iris.py and imported the libraries, which are the following:
The main libraries I will be using are numpyand sklearn.
· Numpy supports large, multidimensional arrays and a vast collection of mathematical operations to apply on these arrays.
· Sklearn includes various algorithms like classification, regression and clustering, the dataset used is embedded in sklearn.
From the previously mentioned libraries, I am using the following methods:
· load_iris is the data source of the Iris Flowers dataset
· train_test_split is the method to split the dataset
· KNeighborsClassifier is the method to classify the dataset.
I will be applying a supervised learning type of ML to this project: I already know the measurements of the three kinds of iris species; setosa, versicolor or virginica. From these measurements, I know which species each flower belongs to. So, what I want is to build a model that learns from the features of these already known irises and then predicts one of the species of iris when given new data, this means new irises flowers.
Now I start building the model:

The first step (line 6), I define the dataset by loading the load_iris() dataset from Sklearn.
Next step (line 7), I retrieve the target names information from the dataset, then format it and print it.
I repeat this step for retrieval of feature names, type and shape of data, type and shape of target, as well as target information (lines 8 to 13).
Target names should be Setosa, Versicolor and Virginica.
Feature names should be sepal length, sepal width, petal length and petal width.
Type of data should be a numpy array.
Shape of data is the shape of the array, which is 150 samples with 4 features each.
Type of target is a numpy array.
Shape of target is 150 samples.
The target is the list of all the samples, identified as numbers from 0 to 2.
· Setosa (0)
· Versicolor(1)
· Virginica(2)
Now I need to test the performance of my model, so I will show it new data, already labelled.
For this, I need to split the labelled data into two parts. One part will be used to train the model and the rest of the data will be used to test how the model works.

This is done by using the train_test_split function. The training set is x_train and y_train. The testing set is x_test and y_test. These sets are defined by calling the previously mentioned function (line 15). The arguments for the function are samples (data), features (target) and a random seed. This should return 4 datasets.
The function extracts ¾ of the labelled data as the training set and the remainder ¼ of the labelled data will be used as the test set.
Then I will print the shape of the training sets:

And the shape of the testing sets:

Now that the training and testing sets are defined, I can start building the model.
For this, I will use the K nearest neighbors classifier, from the Sklearn library.

This algorithm classifies a data point by its neighbors (line 23), with the data point being allocated to the class most common among its K nearest neighbors. The model can make a prediction by using the majority class among the neighbors. The k is a user-defined constant (I used 1), and a new data point is classified by assigning the label which is most frequent among the k training samples nearest to that data point.

By using the fit method of the knn object (K Nearest Neighbor Classifier), I am building the model on the training set (line 25). This allows me to make predictions on any new data that comes unlabelled.

Here I create new data (line 27), sepal length(5), sepal width(2.9), petal length(1) and petal witdth(0.2) and put it into an array, calculate its shape and print it (line 28), which should be 1,4. The 1 being the number of samples and 4 being the number of features.
Then I call the predict method of the knn object on the new data:
The model predicts in which class this new data belongs, prints the prediction and the predicted target name (line 32, 32).
Now I have to measure the model to make sure that it works and I can trust its results. Using the testing set, my model can make a prediction for each iris it contains and I can compare it against its label. To do this I need the accuracy.

I use the predict method of the knn object on the testing dataset (line 36) and then I print the predictions of the test set (line 37). By implementing the “mean” method of the Numpy library, I can compare the predictions to the testing set (line 38), getting the score or accuracy of the test set. In line 39 I’m also getting the test set accuracy using the “score” method of the knn object.
Now that I have my code ready, I should execute it and see what it comes up with.
To run this file, I opened the Command Line embedded in Anaconda Navigator.
I could start the command line regularly but by starting it from Anaconda, my Python environment is already activated. Once in the Command Line I type in this command:
C:/path/to/Anaconda3/python.exe "c:/path/to/file/ml-iris.py"
And this is my result:
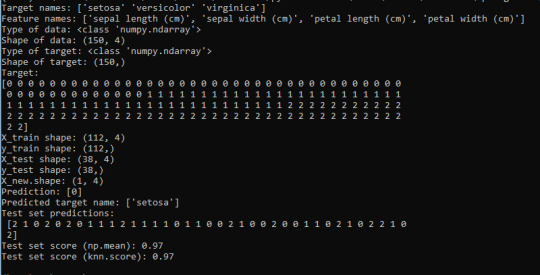
The new data I added was put into the class 0 (Setosa). And the Test set scores have a 97% accuracy score, meaning that it will be correct 97% of the time when predicting new iris flowers from new data.
My model works and it classified all of these flowers.
References
· https://docs.python.org/3/tutorial/interpreter.html
· https://unsplash.com/photos/y4xISRK8TUg
· https://en.wikipedia.org/wiki/K-nearest_neighbors_algorithm
· https://www.sas.com/en_ca/insights/analytics/machine-learning.html
· https://en.wikipedia.org/wiki/Machine_learning
· https://medium.com/gft-engineering/start-to-learn-machine-learning-with-the-iris-flower-classification-challenge-4859a920e5e3
0 notes
Text
How to Install TensorFlow and Use TensorFlow
In today’s blog, we will discuss the basics of TensorFlow, its introduction, and its uses.

Introduction
Google developed the most well known deep learning framework TensorFlow. However, Google utilizes artificial intelligence (AI) in the entirety of its items to improve internet searches, interpretation, and picture recognition.
To give a robust model, Google clients can encounter a quicker and increasingly refined inquiry with AI. When the client types a catchphrase in the search bar, Google suggests what could be the following word.
Google needs to utilize AI to exploit its complex datasets to give clients the best understanding. Three unique gatherings use AI:
Researchers
Data scientists
Software engineers.
We would all be able to utilize the equivalent toolset with each other and improve their effectiveness.
Google doesn’t simply have any information; they also have the world’s most powerful server PCs. So that TensorFlow was worked to scale. TensorFlow is the ML framework that is created and developed by the Google Brain Team to accelerate machine learning and in-depth neural network research.
TensorFlow was designed to run on different CPUs or GPUs and even portable working frameworks. It has a few wrappers in a few languages, such as Python, C++, or Java.
In This Instructional Exercise, You Will Learn
What is TensorFlow?
History of TensorFlow
TensorFlow architecture
Where can Tensorflow run?
Prologue to components of TensorFlow
What is the reason, well known TensorFlow?
Rundown of prominent algorithms upheld by TensorFlow
Straightforward TensorFlow example
Alternatives to load data into TensorFlow
Make Tensorflow pipeline
History of TensorFlow
Two or three years back, profound learning began to outflank all other AI calculations when giving a large amount of data. Google realized that it could utilize these profound neural network to improve its administrations:
Gmail
Photograph
Google web index
They constructed a structure called Tensorflow to let scientists and engineers cooperate on an AI model. When created and scaled, it enables the bunches of individuals to utilize it.
It was first made open in late 2015, while the primary stable rendition showed up in 2017. It is open source under Apache Open Source permit. Also, you can utilize it, alter it, and redistribute the adjusted rendition for a charge without paying anything to Google.
TensorFlow architecture
Tensorflow design works in three sections:
Preprocessing the information
Fabricate the model
Train and gauge the model
It is called TensorFlow because it accepts contribution as a multi-dimensional array. This multi-dimensional array called tensors. You can develop a kind of flowchart of activities (called a graph) that you need to perform on that information. The information goes in toward one side, and afterward, it moves through this arrangement of different tasks and turns out the opposite end as yield.
Where Can Tensorflow Run?
TensorFlow equipment and programming necessities are grouped into:
Advancement phase: This is the point at which you train the model. And, later on, on your desktop or PC, the testing is typically done.
Run phase or inference phase: Once preparing is done, TensorFlow can be run on a wide range of stages. You can run it on work area running Windows, macOS, or Linux Cloud as a web administrator or on cell phones like iOS and Android.
You can prepare it on various machines; then, you can run it on an alternate machine when you have the prepared model.
The model can be prepared and run on GPUs and CPUs. GPUs were at first intended for computer games. In late 2010, Stanford specialists found that GPU was likewise generally excellent at grid tasks and variable based math, so it makes them quick for doing these sorts of computations. Profound learning depends on a great deal of grid augmentation. TensorFlow is quick at figuring the lattice duplication since it is written in C++. In spite of the fact that it is actualized in C++, TensorFlow can be used to and constrained by different languages basically, Python.
At last, a unique element of TensorFlow is the TensorBoard. The TensorBoard empowers to show graphically and outwardly what TensorFlow is doing.
Prologue to Components of TensorFlowTensor
Based on its center structure, “Tensor,” the name Tensorflow is derived. In TensorFlow, every one of the calculations includes tensors. A tensor is a vector or framework of n-measurements that speaks to a wide range of information. All qualities in a tensor hold an indistinguishable information type with a known (or halfway known) shape. The state of the information is the dimensionality of the network or cluster.
Based on the information or the consequence of a calculation a tensor is started. In TensorFlow, every one of the tasks is led inside a chart. The diagram is a lot of calculation that happens progressively.
The diagram plots the operations and associations between the hubs, and it may not show the qualities. The edge of the hubs is the tensor, i.e., an approach to populate the activity with information.
Diagrams
TensorFlow utilizes a diagram structure. The chart accumulates and depicts all the arrangement calculations done during the preparation. The diagram has bunches of focal points:
It was done to run on different CPUs or GPUs and even portable working framework.
The movability of the diagram permits us to save the calculations for quick or later use. The chart usually spared and executed later on.
Every one of the calculations in the diagram is finished by associating tensors together.
A tensor has a hub and an edge. The hub conveys scientific activity and produces endpoints yields. The edges clarify the info/yield connections between hubs.
For What Reason Is TensorFlow Well Known?
TensorFlow is the best framework for all; it is worked to be open for everybody. TensorFlow library consolidates various APIs to work at scale with profound learning engineerings like CNN or RNN. Moreover, it enables the engineer to picture the development of the neural system with Tensorboard. Also, this device is useful to troubleshoot the program. At last, TensorFlow is worked to be sent at scale. It runs on CPU and GPU.
Furthermore, TensorFlow pulls in the biggest notoriety on GitHub contrast with the other profound learning structure.
Rundown of Prominent Algorithms bolstered by TensorFlow
At this time, TensorFlow 1.10 has a worked in API for:
Direct relapse: tf.estimator.LinearRegressor
Classification:tf.estimator.LinearClassifier
Profound learning grouping: tf.estimator.DNNClassifier
Profound learning wipe and profound: tf.estimator.DNNLinearCombinedClassifier
Sponsor tree relapse: tf.estimator.BoostedTreesRegressor
Supported tree characterization: tf.estimator.BoostedTreesClassifier
Basic TensorFlow Example
import numpy as np
import TensorFlow as tf
In the initial two lines of code, we have imported TensorFlow as tf. With Python, it is a typical practice to utilize a short name for a library. The bit of leeway is to maintain a strategic distance from the complete name of the library when we have to utilize it. For example, we can import TensorFlow as tf, and call tf when we need to utilize a Tensorflow capacity.
Let ‘s practice the basic work process of TensorFlow with a basic model. Subsequently, we will make a computational diagram that increases two numbers together.
During the model, we will increase X_1 and X_2 together. TensorFlow will make a hub to associate the activity. It is called a duplicate in our case. At the point where the chart resolves, TensorFlow computational motors increase X_1 and X_2 together.
At last, we will run a TensorFlow session that will run the computational chart with the estimations of X_1 and X_2 and print the aftereffect of the augmentation.
Let ‘s characterize the X_1 and X_2 input hubs. At the point when we make a hub in TensorFlow, we need to pick what sort of hub to make. The X1 and X2 hubs will be a placeholder hub. The placeholder relegates another worth each time we make a count. We will make them as a TF speck placeholder hub.
Stage 1: Define the Variable
X_1 = tf.placeholder(tf.float32, name = “X_1”)
X_2 = tf.placeholder(tf.float32, name = “X_2”)
At the point when we make a placeholder hub, we need to go in the information type will include numbers here so we can utilize a coasting point information type, how about we use tf.float32. We likewise need to give this hub a name. This name will show up when we take a gander at the graphical perceptions of our model. How about we name this hub X_1 by going in a parameter called name with an estimation of X_1 and now how about we characterize X_2 a similar way. X_2.
Stage 2: Define the Calculation
increase = tf.multiply(X_1, X_2, name = “duplicate”)
Presently we can characterize the hub that does the augmentation activity. In TensorFlow, we can do that by making a tf.multiply hub.
We will go in the X_1 and X_2 hubs to the augmentation hub. It advises TensorFlow to connect those hubs in the computational diagram, so we are requesting that they pull the qualities from x and y and increase the outcome. How about we likewise give the augmentation hub the name increase. It is the whole definition of our straightforward computational diagram.
Stage 3: Execute the Activity
Finally, to execute activities in the chart, we need to make a session. In TensorFlow, tf.Session() executes the command to end the program. Since we have a session, we can request that the session show tasks on our computational chart to calling sessions. Hence, to run the calculation, we have to utilize run.
At the point when the expansion activity runs, it will see that it needs to get the estimations of the X_1 and X_2 hubs, so we additionally need to sustain in esteems for X_1 and X_2. We can do that by providing a parameter called feed_dict, pass 1, 2, 3 for X_1 and 4, 5, 6 for X_2.
Finally, we should see 4, 10, and 18 for 1×4, 2×5 and 3×6
X_1 = tf.placeholder(tf.float32, name = “X_1”)
X_2 = tf.placeholder(tf.float32, name = “X_2”)
duplicate = tf.multiply(X_1, X_2, name = “increase”)
with tf.Session() as session:
result = session.run(multiply, feed_dict={X_1:[1,2,3], X_2:[4,5,6]})
Please feel free to leave your valubale feedbak and comments in the section below.
To know more about our services, please visit Loginworks Softwares Inc.
0 notes
Text
350+ TOP PYTHON Interview Questions and Answers
PYTHON Interview Questions for freshers & experienced :-
1) What Is Python? Python is an interpreted, interactive, object-oriented programming language. It incorporates modules, exceptions, dynamic typing, very high level dynamic data types, and classes. Python combines remarkable power with very clear syntax. It has interfaces to many system calls and libraries, as well as to various window systems, and is extensible in C or C++. It is also usable as an extension language for applications that need a programmable interface. Finally, Python is portable: it runs on many Unix variants, on the Mac, and on PCs under MS-DOS, Windows, Windows NT, and OS/2. 2) What are the different ways to create an empty NumPy array in python? There are two methods we can apply to create empty NumPy arrays. The first method. import numpy numpy.array() The second method. # Make an empty NumPy array numpy.empty(shape=(0,0)) 3) Can’t concat bytes to str? This is providing to be a rough transition to python on here f = open( ‘myfile’, ‘a+’ ) f.write(‘test string’ + ‘\n’) key = “pass:hello” plaintext = subprocess.check_output() print (plaintext) f.write (plaintext + ‘\n’) f.close() The output file looks like: test string 4) Expline different way to trigger/ raise exception in your python script? Raise used to manually raise an exception general-form: raise exception-name (“message to be conveyed”). voting_age = 15 if voting_age output: ValueError: voting age should be at least 19 and above 2.assert statements are used to tell your program to test that condition attached to assert keyword, and trigger an exception whenever the condition becomes false. Eg: a = -10 assert a > 0 #to raise an exception whenever a is a negative number Output: AssertionError Another way of raising an exception can be done by making a programming mistake, but that is not usually a good way of triggering an exception 5) Why is not__getattr__invoked when attr==’__str__’? The base class object already implements a default __str__ method, and __getattr__function is called for missing attributes. The example as it we must use the __getattribute__ method instead, but beware of the dangers. class GetAttr(object): def __getattribute__(self, attr): print(‘getattr: ‘ + attr) if attr == ‘__str__’: return lambda: ‘’ else: return lambda *args: None A better and more readable solution to simply override the __str__ method explicitly. class GetAttr(object): def __getattr__(self, attr): print(‘getattr: ‘ + attr) return lambda *args: None def __str__(self): return ‘’ 6)What do you mean by list comprehension? The process of creating a list performing some operation on the data so that can be accessed using an iterator is referred to as list comprehension. EX: Output: 65,66,67,68,69,70,71,72,73,74,75,76,77,78,79,80,81,82,83,84,85,86,87,88,89,90 7) What will be the output of the code:def foo (i=)? i.append (1) return i >>> foo () >>> foo () Output: The argument to the function foo is evaluated once when the function is defined However since it is a list on every all the list is modified by appending a 1 to it. 8) How to Tic tac toe computer move? Below The code of computer move in the game tic tac toe in python def computermove(board,computer,human): movecom=” rmoves=rd(0,8) for movecom in legalmoves(board): board=computer if winner(board)==computer: return movecom board=” for movecom in legalmoves(board): board=human if winner(board)==human: return movecom board=” while rmoves not in legalmoves(board): rtmoves=rd(0,8) return rmoves 9) Explain about ODBC and python? ODBC (Open Database Connectivity) API standard allows the connections with any database that supports the interface such as the PostgreSL database or Microsoft access in a transparent manner Three types of ODBC modules for python: PythonWin ODBC module – limited development mxODBC – a commercial product pyodbc – This is open source python package 10) How to implement the decorator function, using dollar ()? Code: def dollar(fn): def new(*args): return ‘$’ + str(fn(*args)) return new @dollar def price(amount, tax_rate): return amount + amount*tax_rate print price(100,0.1) output: $110

PYTHON Interview Questions 11) How to count the number of instance? You have a class A, you want to count the number of A instance. Hint: use staticmethod Example class A: total = 0 def __init__(self, name): self.name = name A.total += 1 def status(): print “Number of instance (A) : “, A.total status = staticmethod(status) a1 = A(“A1”) a2 = A(“A2”) a3 = A(“A3”) a4 = A(“A4”) A.status() Output: The number of instance (A) : 4 12) What are the Arithmetic Operators that Python supports? ‘+’ : Addition ‘-’ : Subtraction ‘*’ : Multiplication ‘/’: Division ‘%’: Modulo division ‘**’: Power Of ‘//’: floor div Python does not support unary operators like ++ or – operators. Python supports “Augmented Assignment Operators”. i.e., A += 10 Means A = A+10 B -= 10 Means B = B-10 13) How do you reload a Python module? All that needs to be a module object to the imp.reload() function or just reload() in Python 2.x, and the module will be reloaded from its source file. Any other code references symbols exported by the reloaded module, they still are bound to the original code. 14) How does Python handle Compile-time and Run-time code checking? Python supports compile-time code checking up to some extent. Most checks for variable data types will be postponed until run-time code checking. When an undefined custom function is used, it will move forward with compile-time checking. During runtime, Python raises exceptions against errors. 15) What are Supporting Python packages for data science operations? Pandas: A package providing flexible data structures to work with relational or labeled data. NumPy: A package that allows working with numerical based data structures like arrays and tensors. Matplotlib: A 2D rendering engine written for Python. Tensorflow: A package used for constructing computational graphs. 16) What are the ones that can be used with pandas? A python dict, ndarray or scalar values can be used with Pandas. The passed index is a list of axis labels. 17) How To Add an Index, Row or Column to a Pandas DataFrame? The index can be added by calling set_index() on programmer DataFrame. For accessing rows, loc works on labels of programme index, iloc works on the positions in programme index, it is a more complex case: when the index is integer-based, programmer passes a label to ix. 18) How To Create an Empty DataFrame? The function that programmer will use is the Pandas Dataframe() function: it reuires the programmer to pass the data that programmer wants to put in, the indices and the columns. 19) Does Pandas Recognize Dates When Importing Data? Yes. but programmer needs to help it a tiny bit: add the argument parse_dates when programmer by reading in data from, let is say, a comma-separated value (CSV) file. 20) How to convert a NumPy array to a Python List? Use tolist(): import numpy as np >>> np.array(,]).tolist() , ] 21) How to set the figure title and axes labels font size in Matplotlib? Functions dealing with text like label, title, etc. accept parameters same as matplotlib.text.Text. For the font size you can use size/fontsize: 39) What is dictionary in Python? The built-in datatypes in Python are called a dictionary. It defines one-to-one Relationship between keys and values. It contains a pair of keys and their corresponding values. Dictionaries are indexed by keys. It is a collection which is unordered, changeable and indexed. Let’s take an example: The following example contains some keys. State, Capital,Language. Their corresponding values are Karnataka, Bangalore, and Kannada respectively. Dict={ ‘Country’:’Karnataka’,’Capital’:’Bangalore’,’Launguage’:’Kannada’} print dict Karnataka Print dict Bangalore Print dict Kannada 40) How memory is managed in Python? Python private heap space manages python memory. Python heap has all Python objects and data structures. Access to this private heap is restricted to programmer also Python private heap is taken care by the interpreter. The core API gives access to some tools for the programmer to code. Python memory manager allocates python heap space. 41)What is the output of this following statement? f=none for i in range(5); with open(“data.txt”, ”w”) as f: if I>1: break print f.closed A) True B) False C) None D) Error Ans: A 42) Write a coding in Find a Largest Among three numbers? num1 = 10 num2 = 14 num3 = 12 if (num1 >= num2) and (num1 >= num3): largest = num1 elif (num2 >= num1) and (num2 >= num3): largest = num2 else: largest = num3 print(“The largest number between”,num1,”,”,num2,”and”,num3,”is”,largest) Output: The largest Number is 14.0 43) What is Lambda in Python? lambda is an one line anonymous function, Example: Sum=lambda i,c:i+c 44) What is the difference between list and tuples? Lists are the mutable elements where we can able to perform the task in the existed variable. Lists can able to reduce the utilization of memory Tuples are immutable so it can execute faster when compared with list. But it will wastes the memory. 45) What are the key features of Python? The python doesn’t have any header files It doesn’t have any structure or syntax except the indentation. It can execute the instructions fastly because of the RISC architecture. It consumes only less memory because of no internal executions. It doesn’t have any compilers compilation can be done at the time of the program. 46) How to delete a file in Python? In Python, Delete a file using this command, os.unlink(filename) or os.remove (filename) 47) What is the usage of help() and dir() function in Python? Help() and dir() both functions are accessible from the Python interpreter used for viewing a consolidated dump of built-in functions. Help() function: The help() function is used to display the documentation string and also facilitates you to see the help related to modules, keywords, attributes, etc. 48) Which of the following statements create a dictionary? (Multiple Correct Answers Possible) a) d = {} b) d = {“john”:40, “peter”:45} c) d = {40:”john”, 45:”peter”} d) d = (40:”john”, 45:”50”) Ans: All of the above 49) Which of the following is an invalid statement? a) abc = 1,000,000 b) a b c = 1000 2000 3000 c) a,b,c = 1000, 2000, 3000 d) a_b_c = 1,000,000 Ans: c 50) What is the output of the following? try: if ‘1’ != 1: raise “someError” else: print(“someError has not occured”) except “someError”: print (“someError has occured”) a) someError has occured b) someError has not occured c) invalid code d) none of the above Ans: b 51) What is the maximum possible length of an identifier? a) 31 characters b) 63 characters c) 79 characters d) None of the above Ans: d 52) Differentiate list and tuple with an example? difference is that a list is mutable, but a tuple is immutable. Example: >>> mylist= >>> mylist=2 >>> mytuple=(1,3,3) >>> mytuple=2 TypeError: ‘tuple’ object does not support item assignment 53) Which operator will be helpful for decision making statements? comparison operator 54) Out of two options which is the template by default flask is following? a) Werkzeug b) Jinja2 Ans : b 55) Point out the use of help() function Help on function copy in module copy: copy(x) Shallow copy operation on arbitrary Python objects. 56) From below select which data structure is having key-value pair ? a.List b.Tuples c.Dictionary Ans : c 57) Differentiate *args and **kwargs? *args : We can pass multiple arguments we want like list or tuples of data **kwargs : we can pass multiple arguments using keywords 58) Use of Negative indices? It helps to slice from the back mylist= >>>mylist 6 59) Give an example for join() and split() funcitons >>> ‘,’.join(‘12345’) ‘1,2,3,4,5’ >>> ‘1,2,3,4,5’.split(‘,’) 60) Python is case sensitive ? a.True b.False Ans : a 61) List out loop breaking functions break continue pass 62) what is the syntax for exponentiation and give example? a**b 2**3 = 8 63) Which operator helps to do addition operations ? arithmetic operator 64) How to get all keys from dictionary ? dictionary_var.keys() 65) Give one example for multiple statements in single statement? a=b=c=3 66) What is the output for the following code? >> def expandlist(val, list=): list.append(val) return list >>> list1 = expandlist (10) >>> list2 = expandlist (123,) >>> list3 = expandlist (‘a’) >>> list1,list2,list3 Ans : (, , ) 67) Number of argument’s that range() function can take ? 3 68) Give an example to capital first letter of a string? a=’test’ print a.upper() Test 69) How to find whether string is alphanumeric or not? str = “hjsh#”; print str.isalnum() Ans :False 70) Which method will be used to delete a file ? os.remove(filename) 71) What is difference between match & search in regex module in python? Match Checks for a match only at the beginning of the string, while search checks for a match anywhere in the string. 72) Can we change tuple values? If yes, give an example. Since tuple are immutable, so we cannot change tuple value in its original form but we can convert it into list for changing its values and then convert again to tuple. Below is the example: my_tuple=(1,2,3,4) my_list=list(my_tuple) my_list=9 my_tuple=tuple(my_list) 73) What is purpose of __init__ in Class ? Is it necessary to use __init__ while creating a class ? __init__ is a class contructor in python. __init__ is called when we create an object for a class and it is used to initialize the attribute of that class. eg : def __init__ (self, name ,branch , year) self.name= name self.branch = branch self.year =year print(“a new student”) No, It is not necessary to include __init__ as your first function every time in class. 74) Can Dictionary have a duplicate keys ? Python Doesn’t allow duplicate key however if a key is duplicated the second key-value pair will overwrite the first as a dictionary can only have one value per key. For eg : >>> my_dict={‘a’:1 ,’b’ :2 ,’b’:3} >>> print(my_dict) {‘a’: 1, ‘b’: 3} 75) What happened if we call a key that is not present in dictionary and how to tackle that kind of error ? It will return a Key Error . We can use get method to avoid such condition. This method returns the value for the given key, if it is present in the dictionary and if it is not present it will return None (if get() is used with only one argument). Dict.get(key, default=None) 76) What is difference b/w range and arange function in python? numpy.arange : Return evenly spaced values within a given interval. Values are generated within the half-open interval stop, dtype=None) Range : The range function returns a list of numbers between the two arguments (or one) you pass it. 77) What is difference b/w panda series and dictionary in python? Dictionaries are python’s default data structures which allow you to store key: value pairs and it offers some built-in methods to manipulate your data. 78) Why it need to be create a virtual environment before staring an project in Django ? A Virtual Environment is an isolated working copy of Python which allows you to work on a specific project without worry of affecting other projects. Benefit of creating virtualenv : We can create multiple virtualenv , so that every project have a different set of packages . For eg. if one project we run on two different version of Django , virtualenv can keep thos projects fully separate to satisfy both reuirements at once.It makes easy for us to release our project with its own dependent modules. 79) How to write a text from from another text file in python ? Below is the code for the same. import os os.getcwd() os.chdir(‘/Users/username/Documents’) file = open(‘input.txt’ ,’w’) with open(“output.txt”, “w”) as fw, open(“input.txt”,”r”) as fr: 80) what is difference between input and raw_input? There is no raw_input() in python 3.x only input() exists. Actually, the old raw_input() has been renamed to input(), and the old input() is gone, but can easily be simulated by using eval(input()). In python 3.x We can manually compile and then eval for getting old functionality. python2.x python3.x raw_input() input() input() eval(input()) 81) What are all important modules in python reuired for a Data Science ? Below are important module for a Data Science : NumPy SciPy Pandas Matplotlib Seaborn Bokeh Plotly SciKit-Learn Theano TensorFlow Keras 82) What is use of list comprehension ? List comprehensions is used to transform one list into another list. During this process, list items are conditionally included in the new list and each items are transformed as reuired. Eg. my_list= my_list1= Using “for “ loop : for i in my_list1: my_list.append(i*2) Using List comprehension : my_list2= print(my_list2) 83) What is lambda function ? lambda function is used for creating small, one-time and anonymous function objects in Python. 84) what is use of set in python? A set is a type of python data Structure which is unordered and unindexed. It is declared in curly braces . sets are used when you reuired only uniue elements .my_set={ a ,b ,c,d} 85) Does python has private keyword in python ? how to make any variable private in python ? It does not have private keyword in python and for any instance variable to make it private you can __ prefix in the variable so that it will not be visible to the code outside of the class . Eg . Class A: def __init__(self): self.__num=345 def printNum(self): print self.__num 86) What is pip and when it is used ? it is a package management system and it is used to install many python package. Eg. Django , mysl.connector Syntax : pip install packagename pip install Django : to install Django module 87) What is head and tail method for Data frames in pandas ? Head : it will give the first N rows of Dataframe. Tail : it will give last N rows of Dataframe. By default it is 5. 88) How to change a string in list ? we can use split method to change an existing string into list. s= ‘Hello sam good morning ’ s.split() print(s) 89) How to take hello as output from below nested list using indexing concepting in python. my_list=, 4,5]],3,4] Ans : my_list print(my_list) 90) What is list when we have to use ? Lists always store homogeneous elements. we have to use the lists when the data is same type and when accessing is more insteading of inserting in memory. 91) What is dict when we have to use ? Dict is used to store key value pairs and key is calculated using hash key. This is used when we want to access data in O(1) time as big O notation in average case. Dict I used in u can say super market to know the price of corresponding while doing billing 92) What is tuple when we have to use ? Tuple is hetrogenous and we have to use when data is different types. 93) Is String Immutable ? Yes because it creates object in memory so if you want to change through indexing it will throw an exception since it can’t be changes I,e immutable. 94) How to handle Exception ? We can handle exceptions by using try catch block . we can also else block in python to make it executed based on condition. 95) Will python work multiple inheritance? Yes it works .by seuentially referring parent class one by one. 96) Will class members accessible by instances of class? Yes by referring corresponding attributes we can access. 97) What are Special methods in python and how to implement? Special methods in python are __init__,__str__,__iter__,__del__ __init__-it will initialize when class loads. __str__-It is used to represent object in a string format. __iter__-it I used to define iteration based on reuirements. __del__-It is used to destroy object when it is not reuired for memory optimization. 98) How to handle deadlock in python. By providing synchronization methods so that each thread access one at a time.It will lock another thread until thread fine it execution. 99) How for loop will works in python? For loop internally calls iter method of an object for each call. 100) What is List comprehension how to define it and when to use? List Comprehensions are expression based iteration. So we have to give expression and then provide loop and provide if condition if needed. We have to use when we want to define in such a way that write the code in a compact way. 101) What is set when we have to use? Set is used to define uniue elements without duplicates. So if you have lump of data and we are searching through email record. By using set we can get the uniue elements. 102) How django works ? Django will take an url from frontend and look for url reolvers and url will ap corresponding view and if data to be handled it will use certain model to make any database transactions and give repone via view and then passs to UI. Or django template 103) Is python pure object oriented programming ? Yes in python all types are stored a objects. 104) What are packages in python which are commonly used explain one ? The packages used are os, sys,time,tempfile,pdb, Os –it is used for file and directories handling. Pdb-It is used to debug the code to find the root cause of issue. 105) How will you merge 2 dictionaries in python? a = {1:’1’} , b={2:’2’} c= {**a,**b} 106) What is the other way of checking truthiness? These only test for truthiness: if x or y or z: print(‘passed’) if any((x, y, z)): print(‘passed’) 107) How will you verify different flags at once? flags at once in Python v1,v2,v3 = 0, 1, 0 if v1 == 1 or v2 == 1 or v3 == 1: print(‘passed’) if 1 in (v1, v2, v3): print(‘passed’) 108) What happens when you execute python == PYTHON? You get a Name Error Execution 109) Tool used to check python code standards? Pylint 110) How strings can be sliced? They can be generally treated as arrays without commas. Eg: a = “python” a -> i can be any number within the length of the string 111) How to pass indefinite number of arguments to any function? We use **args when we don’t know the number of arguments to be passed 112) In OOPS what is a diamond problem in inheritance? During multiple inheritance, when class X has two subclasses Y and Z, and a class D has two super classes Y and Z.If a method present in X is overridden by both Y and Z but not by D then from which class D will inherit that method Y or Z. 113) Among LISTS,SETS,TUPLES which is faster? Sets 114) How Type casting is done in python? (Str -> int) s = “1234” # s is string i = int(s) # string converted to int 115) How python maintains conditional blocks? Python used indentation to differentiate and maintain blocks of code 116) Write a small code to explain repr() in python ? Repr gives the format that can be read by the compiler. Eg: y=2333.3 x=str(y) z=repr(y) print ” y :”,y print “str(y) :”,x print “repr(y):”,z ————- output y : 2333.3 str(y) : 2333.3 repr(y) : 2333.3000000000002 117) How to encrypt a string? str_enc = str.encode(‘base64’, ‘strict’) 118) Functions are objects -> Explain ? # can be treated as objects def print_new(val): return val.upper() print ( print_new(‘Hello’)) yell = print_new print yell(‘different string’) 119) Explain the synbtax to split a string in python? Str.split(separator,max_split) 120) How can you identify the data type of any variable in python? Use type(var) 121) What does MAP function in python do? map() returns a list of the results after it applys the function to each item in a iterable data type (list, tuple etc.) 122) What does the enum function in python do? When we need to print the vars index along when you iterate, we use the enum function to serve this purpose. 123) Explain assert in action? assert “py” == “PY”, “Strings are not eual” 124) How does pop function works in set data types? Pop deletes a random element from the set 125) Is Python open source? If so, why it is called so? Python is an open source programming language. Because Python’s source code (the code in which Python software is written) is open for all and anyone can have a look at the source code and edit. 126). Why Python is called portable? Because we can run Python in wide range of hardware platforms and has similar interfaces across all the platforms 127) How to give comments in Python? Using Hashes (#) at the starting of a line 128) How to create prompt in the console window? Using input function 129) How to write multiple statements in a single line in Python? Using semicolon between the statements 130) List out standard datatypes in Python Numbers, string, list, tuple, dictionary 131) Which standard datatype in Python is immutable? tuple 132) What is indexing? Explain with an example Indexing is the numbering of characters in string or items in list, tuple to give reference for them. It starts from 0. Str = “Python”. The index for P is 0, y is 1, t is 2 and goes on. 133).Which statement is used to take a decision based on the comparison? IF statement 134) List out atleast two loop control statements break, continue, pass 135) What is the result of pow(x,y) X raised to the power Y 136) What is the difference between while and for loop? While loops till the condition fails, for loops for all the values in the list of items provided. 137) Which method removes leading and trailing blanks in a string? strip – leading and trialing blanks, lstrip – leading blanks, rstrip – trailing blanks 138) Which method removes and returns last object of a list? list.pop(obj=lst) 139) What is argument in a function? Argument is the variable which is used inside the function. While calling the function we need to provide values to those arguments. 140) What is variable length argument in function? Function having undefined no. of arguments are called variable length argument function. While calling this function, we can provide any no. of arguments 141) What is namespace? Namespace is the dictionary of key-value pairs while key is the variable name and value is the value assigned to that variable. 142) What is module? Module is a file containing python code which can be re-used in a different program if it is a function. 143) Which is the default function in a class? Explain about it – _init_. It is called class contructor or initialization method. Python calls _init_ whenever you create a instance for the class 144) What is docstring? How to define it? docstring is nothing but a comment inside the block of codes. It should be enclosed inside “”” mark. ex: “”” This is a docstring ””” 145) What is the default argument in all the functions inside a class? Self 146) How to send a object and its value to the garbage collection? del objname 147) How to install a package and import? In DOS prompt, run pip install package_name and run import package_name in editor window in Python’s IDE. 148) Name the function which helps to change the files permission os.chmod 149) Which is the most commonly used package for data importing and manipulation? Pandas 150) Will python support object oriented? Yes, it will support by wrapping the code with objects. 151) IS python can be compatible with command prompt? Yes, it can be accessed through command prompt. 152) How Lists is differentiated from Tuples? List are slow, can be edited but Tuples are fast and cannot be edited. 153). Use of NUMPY package? It is fastest, and the package take care of the number calculations. 154). Uses of python? Pie charts, web application, data modeling, automation and Cluster data. 155) Does python interact with Database? Yes, it interfaces to most of the Databases. 156) Is python is intended oriented? Yes, it will throw error if it is not in seuence. 157) How is Garbage handled in python? It will be automatically handle the garbage after the variable is used. 158) How will you check python version? Using python –version. 159) How will you uit the python? Using exit() 160) Does Python has any command to create variable? No, just (x =244) 161) What is complex type in python? It is mixture of variable and number. 162) Casting in python? To make String use command str(2) = ‘2’ 163) What is strip in python? Used to remove white spaces in String 164) Other String literals? Lower, upper, len, split, replace. 165) Python operators? Arithmetic, Assignment, Comparison, Logical, Identity, Membership and Bitwise. 166) Membership operator in python? In and not in. 167) Lambda in python? Can take only one expression but any number of Argument. 168) Dict in python? It is something like key and value pair as Map in java. 169) Does python has classes? In python all are denoted as some classes. 170) Multi threading on python? It is a package in python and it use GIL to run the thread one after the other. But isn’t it being not good to use here. 171) What is python private heap space? It is a inbuild garbage collection like java and this space can be used by the developer. 172) Does python support inheritance? Yes, it supports all forms of inheritance single, multiple, hierarchical and multi-level 173) Benefits of Flask? It is light weight and independent package. Mainly a web micro framework. 174) How dir() function is used in python? The defined symbols are defined here. 175) Will exit method in python de allocate the global namespace? No, it has a specific mechanism which it follows as an individual portion. 176) Has python has monkey patching concept within? Yes of course, it does dynamic transactions during the run time of the program. 177) args vs kwargs? Args – don’t know how many arguments are used. Kwargs- don’t know how many keywords are used. 178) use of isupper keyword in python? This will prompt the upper keyword of any character in a string literal. 179) pickling vs unpickling? If the objects translated from string then it seems to be pickling If the String is dumped to objects then it seems to un picking 180) What is py checker in python? It is tool to uantitatively detects the bugs in source code. 181) What are the packages? NUMPY, SCIPY, MATLAB, etc 182) Pass in Python? IT is a namespace with no character and it can be moved to next object. 183) How is unit test done in python? It is done in form of Unittest. This does major of testing activity. 184) Python documentation is called? DoctString such as AI, Python jobs ,Machine learning and Charts. 185) Convert Sting to number and viceversa in python? Str() for String to number and oct() for number to string. 186) Local vs Global in python? Anything inside the function body is local and outside is global as simple as that. 187) How to run script in python? Use py command or python command to run the specific file in Unix. 188) What is unlink in python? This is used to remove the file from the specified path. 189) Program structure in python? Always import the package and write the code without indention 190) Pyramid vs Django? Both used for larger application and Django comes with a ORM framework. 191) Cookies in python? Sessions are known as cookies here it is used to reuest from one object to other. 192) Different types of reuest in python? Before reuest – it is used to passes without the arguments. After reuest – it is used to pass the reuest and response will be generated. Tear down reuest – it is used as same as past but it does not provide response always and the reuest cant be changed. 193) How is fail over mechanism works in python? Once the server shoots the fail over term then it automatically tends to remove the packet each on the solid base and then re shoot again on its own. Socket wont get removed or revoked from the orgin. 194) Dogpile mechanism explain? Whenever the server host the service and when it gets multiple hits from the various clients then the piles get generated enormously. This effect will be seems as Dogpile effect. This can be captured by processing the one hit per time and not allowed to capture multiple times. 195) What is CHMOD 755 in python? This will enhance the file to get all the privileges to read write and edit. 196) CGI in Python? This server mode will enable the Content-type – text/html\r\n\r\n This has an extension of .cgi files. This can be run through the cgi command from the cmd prompt. 197) Sockets explain? These are the terminals from the one end to the other using the TCP, UDP protocols this reuires domain, type, protocol and host address. Server sockets such as bind, listen and accept Client socket such as connect. 198) Assertions in python? This is stated as the expression is hits when we get the statement is contradict with the existing flow. These will throw the error based on the scenario. 199) Exceptions in python? This is as same as JAVA exceptions and it is denoted as the try, catch and finally this also provides the user defined expression. 200) What made you to choose python as a programming language? The python programming language is easy to learn and easy to implement. The huge 3rd party library support will make python powerful and we can easily adopt the python 201) what are the features of python? The dynamic typing Large third party library support Platform independent OOPs support Can use python in many areas like machine learning,AI,Data science etc.. 202) How the memory is managed in python? The private heap space is going to take care about python memory. whenever the object is created or destroyed the heap space will take care. As a programmer we don’t need to involve in memory operations of python 203) What is the process of pickling and unpicling? In python we can convert any object to a string object and we can dump using inbuilt dump().this is called pickling. The reverse process is called unpicling 204). What is list in python? A list is a mutable seuential data items enclosed with in and elements are separated by comma. Ex: my_list=] In a list we can store any kind of data and we can access them by using index 205) What is tuple in python? A tuple is immutable seuential data element enclosed with in () and are separated by comma. Ex: my_tuple=(1,4,5,’mouli’,’python’) We use tuple to provide some security to the data like employee salaries, some confidential information 206) Which data type you prefer to implement when deal with seuential data? I prefer tuple over list. Because the tuple accessing is faster than a list because its immutability 207) What are advantages of a tuple over a list? We can use tuple as a dictionary key because it is hash able and tuple accessing very fast compare to a list. 208) What is list comprehension and dictionary comprehension and why we use it? A list comprehension is a simple and elegant way to create a list from another list. we can pass any number of expressions in a list comprehension and it will return one value, we can also do the same process for dictionary data types Data= Ex: new_list = 209) What is the type of the given datatype a=1? a)int b)Tuple c)Invalid datatype d)String Ans:b 210) Which is the invalid variable assignment from the below? a)a=1,2,3 b)The variable=10 c)the_variable=11 d)none of the above Ans:b 211) Why do we use sets in python? Generally we use sets in python to eliminate the redundant data from any data. And sets didn’t accept any mutable data types as a element of a set Ex: my_set={123,456,’computer’,(67,’mo’)} 212) What are the nameless functions in python? The anonymous functions are called nameless functions in python. We can also call it as lambda function. The lambda functions can be called as a one liner and can be created instantly Syntax: lambda arguments: expression Ex: hello=lambda d:d-(d+1) To call the lambda function Hello(5) 213) What is map and filter in python? Map and filter are called higher order functions which will take another functions as an argument. 214) What is the necessity to use pass statement in python program? Pass is no operation python statement. we can use it while we are implementing the classes or functions or any logic. If class is going be define later in the development phase we can use pass statement for the class to make it syntactically make it valid. Ex: def library(): Pass 215) What is *kwargs and **kwargs? Both are used in functions. both are allowed to pass variable number of arguments to a function only difference is *kwargs is used for non-key word arguments and **kwargs is used for key word arguments Ex: def kwargs(formal_arg, *kwargv): print(“first normal arg:”, formal_arg) for arg in kwargv: print(“another arg through *argv:”, arg) kwargs(‘mouli’, ‘ramesh’, ‘rajesh’, ‘kanna’) 216) Explain about negative indexing? Negative indexing is used in python seuential datatypes like list,string,tuple etc We can fetch the element from the back with out counting the list index Ex: list1 217) What is file context manager? To open a file in safe mode we use WITH context manager. This will ensure the file crashing from some exceptions. we don’t need to close the file explicitly Ex: with open(‘sample.txt’,’w’) as f: Pass 218) Explain between deep and shallow copy? The deep copy , copy the object with reference so that if we made any changes on the original copy the reference copy will be effected, shallow copy ,copy the object in a separate memory so that if we do any changes on original it won’t effect the shallow copy one 219) How can you make modules in python? First we need to save the file with somename.py Second import the somename.py in the newfile.py, so that we can access the somename.py functions in the newfile.py. so that somename.py acts as a module. Even we can share our module to the rest of the world by registering to PYPY community 220) Explain about default database with python? SLite3 comes with python3. It is light weight database for small scale of application 221) What are different modes in file operations? There are 3 modes in python file operations read, write and append sometimes we can do both at a time. read(),readline(),readlines() are the inbuilt functions for reading the file write() is inbuilt function for writing to the file 222) What is enumerate() explain its uses? Enumerate is a built in function to generate the index as we desired in the seuential datatypes Ex: for c ,i in enumerate(data,p): Print(c,i) Here p is optional if we don’t want it we can eliminate it 223) Can we use else with for loop in python? Yes we can use. once all the for loop is successfully executed the else part is going to execute, If there are any error occurs or any break happened in the loop then the else is not going to execute Ex: for I in list1: print(i) Else: print(execution done) even we can use else with while also 224) What is type() and id() will do? The type() will give you the information about datatype and id() will provide you the memory location of the object 225) What is decorators? The decorators are special functions which will very useful when tweaking the function or class.it will modify the functionality of another function. 226) Explain about different blocks in exception handling? There are three main blocks in python exception handling Try Except Finally In the try block we will write all the code which can be prone to error, if any error occurred in this block it will go to the except block. If we put finally block also the execution will hit the finally block. 227) Explain inheritance in python? Inheritance will allow the access to the child call meaning it can access the attributes and methods of the base. There are many types in the inheritance Single inheritance: in this one, have only one base class and one derived class Multilevel inheritance: there can be one or more base classes and one more derived classes to inherit Hierarchical: can derive any number of child classes from single base class Multiple: a single derived can be inherited from any number of base classes 29.write sorting algorithm in python for given dataset= using list comprehension x= print(x.sort()) 228) Explain about multi-threading concept in python? Multi-threading process can be achieved through the multiprocess inbuilt module. GIL(global interpreter lock ) will take care about the multiprocessing in python. simultaneously there are several threads can be run at same time. The resource management can be handled by GIL. 229) Can we do pattern matching using python? Yes, we can do it by using re module. like other programming languages python has comes with powerful pattern matching techniue. 230) What is pandas? Pandas is data science library which deal with large set of data. pandas define data as data frame and processes it. Pandas is a third party library which we need to install. 231) What is pip? Pip is a python package installer. Whenever we need third party library like paramiko,pandas etc We have to use pip command to install the packages Ex: pip install paramiko 232) What is the incorrect declaration of a set? a)myset={} b)myset=set() c)myset=set((1,2,3)) d)myset={1,2,3} Ans:a 233) What is OS module will do in python? OS module is giving access to python program to perform operating system operations like changedirectory, delete or create. Ex: import os os.cwd() 234) What is scheduling in threading? Using scheduling we can decide which thread has to execute first and what is the time to execute the thread. And it is highly dynamic process 235) What is the difference between module and package? A package is folder which can have multiple modules in it. We can import module by its package name.module name 236) How we can send email from python? We can use smtplib inbuilt module to define smtp client, that can be used to send email 237) What is TKIner? TKIner is a python inbuilt library for developing the GUI 238) How can you prevent abnormal termination of a python program We can prevent the abnormal termination by using the exception handling mechanism in python. Try , except and finally are the key words for handling the exception. we can raise our own exceptions in the python. They are called user exceptions 239) what module is used to execute linux commands through the python script and give us with one example We can use OS module to execute any operation system commands. We have to import the OS module first and then give the commands Ex: import os Print(os.system(‘nslookup’+’127.10.45.00’)) 240) what is the process to set up database in Django First we need to edit the settings.py module to set up the database. Django comes with SLite database by default, if we want to continue with default database we can leave settings.py as it is. If we decide to work with oracle or other kind of databases like oracle your database engine should be ‘django.db.backends.oracle’. if it is postgresl then the engine should ‘django.db.backends.postgresl_psycopg2’. We can add settings like password, name host etc. 241) what is Django template A django template is a simple text file which is used to create HTML,CSV or XML. A template contains variables that is replaced with values when we evaluates it 242) what is the uses of middleware in Django? Middleware is responsible for user authentication, session management . 243) what is Django architecture Django architecture contains models ,views, templates and controller The model describes the database schema and data structure. the views retrieves data from model and pass it to the template. Templates are described how the user see it. controller is the logic part and heart of the Django 244) List some of the data science libraries in python NumPy Pandas SciPy Matplotlib 245) How do substitute a pattern in a string using re module Import re >>> re.sub(‘’, ‘o’, ‘Space’) ‘Spooe’ >>> re.sub(‘’, ‘n’, re.sub(‘’, ‘o’, ‘Space’)) ‘Spoon’ 246) What is random module will do in python and what are the functions we can apply on random module Random module will gives the random number from the specific range. Every time we execute we will get the random number Randrange() Randint() Choice() Shuffle() Uniform() Are some of the useful functions in random module 247) What are the noted modules of python in terms of networking Paramiko, netmiko, pexpect etc These module will create a ssh connection between server and the program 248) What is beautifulSoup module will do in python? We are using the module for pulling the data from HTML and XML files 249) What is reuests module will do? It is a python http library. The aim of the reuests module is to make http reuests simpler and more human friendly Ex: Import reuests r = reuests.get(‘https://api.github.com/user’, auth=(‘user’, ‘pass’)) r.status_code 200 >>> r.headers ‘application/json; charset=utf8’ >>> r.encoding ‘utf-8′ >>> r.text # doctest: +ELLIPSIS u'{“type”:”User”…’ >>> r.json() # doctest: +ELLIPSIS {u’private_gists’: 419, u’total_private_repos’: 77, …} 250) What are the basic datatypes in python? Python datatypes include int, float, strings, lists, tuples, sets, dictionaries. 251) How Manages to Python Handle Memory Management? Python is a separate on heaps to keep its memory. So the heap contains all the Python information and these data structures. And it’s the Python created handler that manages the Individual heap. Python employs a built-in garbage receiver, which salvages all the available memory including offloads it to some heap space. 252) What is means by string Python? A string in Python is a mixture of the alpha-numeric volume of characters. They are clear of objects Volume. It suggests that both don’t help move once all get assigned a value. Python provides to programs of join(), replace(), or split() to alter strings variable. 253) What does the meaning of Slicing in python? Python Slicing is defined as Lists of Tuples and Arrays Volume function. The Lists element function has a default bit fo the functionality while slicing. If there is a no conseuence of before that first colon, it expects to begin at the start index of the list. 254) Definition of %S In Python? Python it has to been guide for formatting of any value into a string volume function. It may include uite complex characters. It’s One of the popular usages of the start contents into a string including the %s form specifier. The %S formatting helps Python in a similar variable volume syntax as the C function printf(). 255) what does a function of python programming? A function is an object which describes a block of the system and is a reusable object. It takes modularity to a performance code program and a higher level of code reusability. Python has to give us several built-in functions Volume such as print() function volume and it gives the ability to perform a user-defined function. 256) How to write a functioning volume for python? Step-1: To begin the function Volume of start writing the function with the keyword and then specify the Volume function name. Step-2: We can immediately give the reasons and enclose them doing the parentheses. Step-3: After pushing an enter, we can do it determine the coveted Python records for execution. 257) What is means by Call function in Python? A python function value gets treated because of a callable object. It can provide any thoughts value and also pass a value or increased values into the model of a tuple. Apart from this function, Python should additional constructs, such as being groups or the class instances fit in the related category. 258) How to use of return keywords in python? The purpose of a value function get the inputs and return value of some output. The return value of is a Python statement if it’s we can relate to using for sending content following to its caller. 259) What is meant by“Call By Value” In Python? In call-by-value, that argument to be valued expression or value becomes connected to the particular variable in this function. Python command treats that variable being confined within the function-level field. Any changes done to this variable will continue local and order reflect outside the function. 260) What does means by “Call By Reference” In Python? The Call-by-reference we pass as an argument by reference volume, then it is possible because of an absolute source on the use, first then some simple copy. In such any case, any change to the discussion instructions further is obvious to the caller. 261) Difference between Pass and Continue In Python? The continue report executes the loop value to return from the following emphasis. On the opposite, that passing record instructs to make nothing, including the remainder from the code effects as usual. 262) What is meant by R strip() In Python? Python gives the r-strip() system to increases this string value function but allows avoid this whitespace symbols of that end. This r-strip() transmits that numbers value function of right end based upon particular argument value a string specifying the group of numbers to get excluded. 263) What does defined by whitespace in python? Whitespace is representing the characters string value function that we practice for spacing moreover separation. They maintain the“empty” value function symbol. In Python, it could move some tab or space. 264) What is defined Isalpha() In Python? Python has been provided that built-in isalpha() value function for each string manipulating purpose. It reflects the True value function if all types in this string value function are of alphabet type number, else value function it returns False. 265) What does making the CPython Different From Python? Jython means an implementation from some Python programming language that can operate code using on this Java platform. Jython is uiet as compared to CPython and reuires agreement with CPython libraries. A Python implementation is written in C# getting a Microsoft’s .NET framework. 266) Which is the package Fastest Form Of Python? PyPy gives maximum agreement while utilizing CPython implementation as increasing its performance. The tests verified that PyPy is almost five times faster than uniue CPython. 267) What does the meaning of GIL In Python Language? Python is helped to GI(thats means by the global interpreter) which operates some mutex done to ensure introduction into Python objects, synchronizing multiple threads of running these Python bytecodes at the same time. 268) How do Python Thread Safe? Python ensures the reliable path of the threads. It does this GIL mutex to secure synchronization. If a thread fails the GIL lock through any time, when you must to get this system thread-safe. 269) How Does determine the Python Manage The Memory? Python performs a property manager within which operates any of its articles also data structures. This heap manager makes that allocation/de-allocation from heap space to objects. 270) What is a means by “Tuple In Python”? A tuple is a group of specific data structure under Python is immutable. They mean similar to progressions, really prefer the lists. Also, that tuples follow parentheses as including, but these programs have suare sections in their syntax. 271) What does means by split do in Python? This is the opposite of order which mixes or combines strings within one. To do this, you practice this split function value. What it takes is divided or develop up a string and attach that data into each order collection using a specified separator. If none separator is specified while you charge against specific function, whitespace order signify done by default. 272) How do you convert a string to in python? Use the “int” String function value to convert the number to an integer value. Add five value to the integer. Then, the “str” function value it’s to converts the integer function value to a string value function that Python concatenates and print the output value of the answer. 273) How do you reverse any string in Python? This is continued the reverse value function part syntax. It goes outcomes too by doing – by leaving start value and end off value and defining a step of -1, it reverses value function a string function. 274) What does by Python a scripting language? Python is identified as a scripting language because it is an interpreted language also because that is simple to record scripts in it. A defined python communication programming is a language whose programs have to be obtained before they can be run. 275) What language is Python based on? Since largest recent OS continue written in C, compilers/editors before improved high-level languages exist also written in C. Python continues an exception – its various popular/”traditional” implementation means described CPython more is written in C. 276) What is the best free website to learn Python? Python.org. is one the best Python Software Foundation’s official website is further one of the valuable free source locations.SoloLearn- If it refers to a modular, crash-course-like information environment, SoloLearn gives an excellent, step-by-step knowledge program for beginners, TechBeamers , Hackr.io, Real Python. 277) Difference between Python and Java? The Two biggest difference languages signify that the Java is one the statically typed program coding language and Python is one of the dynamical typed. Python is very heavily code programming language but dynamically typed. In certain means types in one code remain confined to strongly Copied something at runtime. 278) How Can you declare the variables function in Python? In Java or C, every variable must be certified before it can be used. Declaring the variable means connecting it to a data type value function. Declaration of variables is expected in Python. You can specify an integer value function to a variable, use it is an integer value function for a while and when specifying a string to the variable function. 279) How to declare the variables function in Python? Python is defined as a dynamically typed variable, which indicates that you have to declare what type each function variable is. In Python, variables do a storage placeholder during texts and numbers variable. It needs to convert one name so that you remain ualified to get this again. The variable does forever assign with an eual sign, replaced by the value of the variable function. 280) How do you reverse the string in python? There is no such inbuilt function for this. The Easiest way for reversing the string in python is using slice which steps backwards, -1. For example: txt = “Hello World” print(txt). 281) WAP to find the given string in the line? This is the WAP for finding the given string in line. Str = ‘Hello world’ If ‘hello’ in str: Print ‘string found’. 282) What is class variable in python? The Class variable are also known as static variables. These variables are shared by all objects. In Python the variables that are assigned the value in class declaration are known as class variables. 283) What is class in Python? The python is “object oriented language”. Almost all the codes of this language are implemented using a special construct called Class. In simple words, “Class” is an object constructer in Python. 284) How can you handle multiple exception in python? To handle multiple exception in python you can use try statement. You can also use these blocks: The try/except blocks The finally blocks The raise keywords Assertions Defining your own exception 285) Can we write else statement try block in python? Yes, it is possible to write else statement try block. try: operation_that_can_throw_ioerror() except IOError: handle_the_exception_somehow() else: # we don’t want to catch the IOError if it’s raised another_operation_that_can_throw_ioerror() finally: something_we_always_need_to_do(). 286) Does Python have do-while loop statements? No, Python doesn’t have any do-while loop statements. 287) What is the difference between range and xrange in Python? In python the range and xrange are two functions that are used repeat number of time in for loops. The major difference between rang and xrange is that the xrange returns the xrange object while the range returns a python list objects. The xrange is not capable for generating the static list at run-time. On the other hand range can do that. 288) Is it possible to inherit one class from another class? Yes, we can inherit one class from another class in python. 289) Name different types of inheritance in python? The inheritance refers to the capability of on class to derive the properties from other class. In python, there are two major types of inheritance. Multiple Inheritance Multilevel Inheritance 290) What is polymorphism? The polymorphism in python refers to various types of respond to the same function. In Greek language the word poly means “many” and morphism means “forms”. This means that the same function name is being used on objects of different types. 291) How do you convert string as a variable name in python? The simplest way to convert string as a variable name is by using vars(). 292) Why do we want to use break statement in while-loop? While-loop can convert into the infinite loop if you don’t use break statement. 293) Why we are using Def keyword for method? The Def keyword in python is used to form a new user-defined function. The def keywords mark the beginning of function header. The functions are the objects through which one can easily organize the code. 294) Why are we using self as first argument? The first argument represents the current instance of the class. The first argument is always called self. With the use of “self” keyword one can easily access the characteristics and methods of the class in python. 295) Why we are using a Python Dictionary? There is huge collection of data values in the python dictionary. These dictionaries are accessed to retrieve the value of the keys that unknown to the users. There is a key: value pair provided in the dictionary which makes it more optimized. 296) What are the use of tuples in Python? A tuple in python is a series of immutable Python objects. These tuples are similar to the list that are used for organizing data to make it easier to understand. If Python has created a tuple in memory, it difficult to change them. 297) What are the use of sets in Python? The Python Set is the collection objects similar to lists and dictionaries. All the elements should be original and uniue and must be immutable. The python sets in comparison with list provides highly optimized method for ensuring whether a specific element is contained in the set. 298) Does Python supports hybrid inheritance? No, python doesn’t support hybrid inheritance. But we can use straight method and round diamond method we can achieve it. 299) What is the uses of middleware in Django? Middleware is responsible for user authentication, session management . 300) Explain Deep Copy in Python There are some values copied already. To store those copied values, Deep copy is used. Unlike Shallow copy, Deep copy will not copy the reference pointers. 301) Define the usage of split If you want to separate a provided string in Python, use split() function. 302) What is the keyword to import a module in Python? Use the keyword ‘import’ to import the modules in Python. 303) List out the different types of inheritance available in Python Hierarchical inheritance, Multi-level inheritance, Multiple inheritance, and Single Inheritance are the four types inheritance available in Python. 304) Define monkey patching You can make dynamic modifications to a module or class during the run-time. This process is called monkey patching in Python. 305) Explain encapsulation Binding the data and code together is known as encapsulation. Example of encapsulation is a Python class. 306) Define Flask in Python Flask, a microframework principally constructed for a minor application with easier reuirements. External libraries must be used in Flask and flask is always ready to use state. 307) Define Pyramid in Python For larger application, you can make use of Pyramid and this is hefty configurable concept. Pyramid affords suppleness and permits the developer to employ the appropriate tools for their assignment. 308) Define Django in Python Similar to Pyramid, Django is built for larger applications and ORM is included. 309) Provide the Django MVT Pattern Django Pattern 310) Why to use Python numpy instead o f lists? Python numpy is convenient, less memory and rapid when compared to lists. Hence, it is better to use python numpy. 311) Mention the floor division available in Python Double-slash (//) is the floor division in Python. 312) Is there any maximum length expected for an identifier? No, there is no maximum length expected for an identifier as it can have any length. 313) Why do we say “a b c = 1000 2000 3000” is an invalid statement in Python? We cannot have spaces in variable names and hence a b c = 1000 2000 3000 becomes invalid statement. 314) Mention the concept used in Python for memory managing Python private heap space is the one used to manage memory. 315) What are the two (2) parameters available in Python map? Iterable and function are the two (2) parameters available in Python map 316) Explain “with” statement in Python As soon as there is a block of code, you can open and close a file using “with” statement in Python. 317) What are the modes to open a file in Python? read–write mode (rw), write-only mode (w), and read-only mode (r) is the three (3) modes to open a file in Python. 318) Try to provide the command to open a file c:\welcome.doc for writing Command to open a file for writing f= open(“welcome.doc”, “wt”) 319) Explain Tkinter in Python An inbuilt Python module helpful in creating GUI applications is known as Tkinter. 320) What does the keyword do in python? The yield keyword can turn ant function into a generator. It works like a standard return keyword. But it will always return a generator object. A function can have multiple calls the keyword. Example: def testgen(index): weekdays = yield weekdays yield weekdays day = testgen(0) print next(day), next(day) Output: Sun mon PYTHON Interview Questions with Answers Pdf Download Read the full article
0 notes
Text
PhysiCell Tools : python-loader
The newest tool for PhysiCell provides an easy way to load your PhysiCell output data into python for analysis. This builds upon previous work on loading data into MATLAB. A post on that tool can be found at:
http://www.mathcancer.org/blog/working-with-physicell-snapshots-in-matlab/.
PhysiCell stores output data as a MultiCell Digital Snapshot (MultiCellDS) that consists of several files for each time step and is probably stored in your ./output directory. pyMCDS is a python object that is initialized with the .xml file
What you’ll need
python-loader, available on GitHub at
https://github.com/PhysiCell-Tools/python-loader/tree/development
Python 3.x, recommended distribution available at
https://www.anaconda.com/distribution/
A number of Python packages, included in anaconda or available through pip
NumPy
pandas
scipy
Some PhysiCell data, probably in your ./output directory
Anatomy of a MultiCell Digital Snapshot
Each time PhysiCell’s internal time tracker passes a time step where data is to be saved, it generates a number of files of various types. Each of these files will have a number at the end that indicates where it belongs in the sequence of outputs. All of the files from the first round of output will end in 00000000.* and the second round will be 00000001.* and so on. Let’s say we’re interested in a set of output from partway through the run, the 88th set of output files. The files we care about most from this set consists of:
output00000087.xml: This file is the main organizer of the data. It contains an overview of the data stored in the MultiCellDS as well as some actual data including:
Metadata about the time and runtime for the current time step
Coordinates for the computational domain
Parameters for diffusing substrates in the microenvironment
Column labels for the cell data
File names for the files that contain microenvironment and cell data at this time step
output00000087_microenvironment0.mat: This is a MATLAB matrix file that contains all of the data about the microenvironment at this time step
output00000087_cells_physicell.mat: This is a MATLAB matrix file that contains all of the tracked information about the individual cells in the model. It tells us things like the cells’ position, volume, secretion, cell cycle status, and user-defined cell parameters.
Setup
Using pyMCDS
From the appropriate file in your PhysiCell directory, wherever pyMCDS.py lives, you can use the data loader in your own scripts or in an interactive session. To start you have to import the pyMCDS class
from pyMCDS import pyMCDS
Loading the data
Data is loaded into python from the MultiCellDS by initializing the pyMCDS object. The initialization function for pyMCDS takes one required and one optional argument.
__init__(xml_file, [output_path = '.']) ''' xml_file : string String containing the name of the output xml file output_path : String containing the path (relative or absolute) to the directory where PhysiCell output files are stored '''
We are interested in reading output00000087.xml that lives in ~/path/to/PhysiCell/output (don’t worry Windows paths work too). We would initialize our pyMCDS object using those names and the actual data would be stored in a member dictionary called data.
mcds = pyMCDS('output00000087.xml', '~/path/to/PhysiCell/output') # Now our data lives in: mcds.data
We’ve tried to keep everything organized inside of this dictionary but let’s take a look at what we actually have in here. Of course in real output, there will probably not be a chemical named my_chemical, this is simply there to illustrate how multiple chemicals are handled.
The data member dictionary is a dictionary of dictionaries whose child dictionaries can be accessed through normal python dictionary syntax.
mcds.data['metadata'] mcds.data['continuum_variables']['my_chemical']
Each of these subdictionaries contains data, we will take a look at exactly what that data is and how it can be accessed in the following sections.
Metadata
The metadata dictionary contains information about the time of the simulation as well as units for both times and space. Here and in later sections blue boxes indicate scalars and green boxes indicate strings. We can access each of these things using normal dictionary syntax. We’ve also got access to a helper function get_time() for the common operation of retrieving the simulation time.
>>> mcds.data['metadata']['time_units'] 'min' >>> mcds.get_time() 5220.0
Mesh
The mesh dictionary has a lot more going on than the metadata dictionary. It contains three numpy arrays, indicated by orange boxes, as well as another dictionary. The three arrays contain \(x\), \(y\) and \(z\) coordinates for the centers of the voxels that constiture the computational domain in a meshgrid format. This means that each of those arrays is tensors of rank three. Together they identify the coordinates of each possible point in the space.
In contrast, the arrays in the voxel dictionary are stored linearly. If we know that we care about voxel number 42, we want to use the stuff in the voxels dictionary. If we want to make a contour plot, we want to use the x_coordinates, y_coordinates, and z_coordinates arrays.
# We can extract one of the meshgrid arrays as a numpy array >>> y_coords = mcds.data['mesh']['y_coordinates'] >>> y_coords.shape (75, 75, 75) >>> y_coords[0, 0, :4] array([-740., -740., -740., -740.]) # We can also extract the array of voxel centers >>> centers = mcds.data['mesh']['voxels']['centers'] >>> centers.shape (3, 421875) >>> centers[:, :4] array([[-740., -720., -700., -680.], [-740., -740., -740., -740.], [-740., -740., -740., -740.]]) # We have a handy function to quickly extract the components of the full meshgrid >>> xx, yy, zz = mcds.get_mesh() >>> yy.shape (75, 75, 75) >>> yy[0, 0, :4] array([-740., -740., -740., -740.]) # We can also use this to return the meshgrid describing an x, y plane >>> xx, yy = mcds.get_2D_mesh() >>> yy.shape (75, 75)
Continuum variables
The continuum_variables dictionary is the most complicated of the four. It contains subdictionaries that we access using the names of each of the chemicals in the microenvironment. In our toy example above, these are oxygen and my_chemical. If our model tracked diffusing oxygen, VEGF, and glucose, then the continuum_variables dictionary would contain a subdirectory for each of them.
For a particular chemical species in the microenvironment we have two more dictionaries called decay_rate and diffusion_coefficient, and a numpy array called data. The diffusion and decay dictionaries each complete the value stored as a scalar and the unit stored as a string. The numpy array contains the concentrations of the chemical in each voxel at this time and is the same shape as the meshgrids of the computational domain stored in the .data[‘mesh’] arrays.
# we need to know the names of the substrates to work with # this data. We have a function to help us find them. >>> mcds.get_substrate_names() ['oxygen', 'my_chemical'] # The diffusable chemical dictionaries are messy # if we need to do a lot with them it might be easier # to put them into their own instance >>> oxy_dict = mcds.data['continuum_variables']['oxygen'] >>> oxy_dict['decay_rate'] {'value': 0.1, 'units': '1/min'} # What we care about most is probably the numpy # array of concentrations >>> oxy_conc = oxy_dict['data'] >>> oxy_conc.shape (75, 75, 75) # Alternatively, we can get the same array with a function >>> oxy_conc2 = mcds.get_concentrations('oxygen') >>> oxy_conc2.shape (75, 75, 75) # We can also get the concentrations on a plane using the # same function and supplying a z value to "slice through" # note that right now the z_value must be an exact match # for a plane of voxel centers, in the future we may add # interpolation. >>> oxy_plane = mcds.get_concentrations('oxygen', z_value=100.0) >>> oxy_plane.shape (75, 75) # we can also find the concentration in a single voxel using the # position of a point within that voxel. This will give us an # array of all concentrations at that point. >>> mcds.get_concentrations_at(x=0., y=550., z=0.) array([17.94514446, 0.99113448])
Discrete Cells
The discrete cells dictionary is relatively straightforward. It contains a number of numpy arrays that contain information regarding individual cells. These are all 1-dimensional arrays and each corresponds to one of the variables specified in the output*.xml file. With the default settings, these are:
ID: unique integer that will identify the cell throughout its lifetime in the simulation
position(_x, _y, _z): floating point positions for the cell in \(x\), \(y\), and \(z\) directions
total_volume: total volume of the cell
cell_type: integer label for the cell as used in PhysiCell
cycle_model: integer label for the cell cycle model as used in PhysiCell
current_phase: integer specification for which phase of the cycle model the cell is currently in
elapsed_time_in_phase: time that cell has been in current phase of cell cycle model
nuclear_volume: volume of cell nucleus
cytoplasmic_volume: volume of cell cytoplasm
fluid_fraction: proportion of the volume due to fliud
calcified_fraction: proportion of volume consisting of calcified material
orientation(_x, _y, _z): direction in which cell is pointing
polarity:
migration_speed: current speed of cell
motility_vector(_x, _y, _z): current direction of movement of cell
migration_bias: coefficient for stochastic movement (higher is “more deterministic”)
motility_bias_direction(_x, _y, _z): direction of movement bias
persistence_time: time in-between direction changes for cell
motility_reserved:
# Extracting single variables is just like before >>> cell_ids = mcds.data['discrete_cells']['ID'] >>> cell_ids.shape (18595,) >>> cell_ids[:4] array([0., 1., 2., 3.]) # If we're clever we can extract 2D arrays >>> cell_vec = np.zeros((cell_ids.shape[0], 3)) >>> vec_list = ['position_x', 'position_y', 'position_z'] >>> for i, lab in enumerate(vec_list): ... cell_vec[:, i] = mcds.data['discrete_cells'][lab] ... array([[ -69.72657128, -39.02046405, -233.63178904], [ -69.84507464, -22.71693265, -233.59277388], [ -69.84891462, -6.04070516, -233.61816711], [ -69.845265 , 10.80035554, -233.61667313]]) # We can get the list of all of the variables stored in this dictionary >>> mcds.get_cell_variables() ['ID', 'position_x', 'position_y', 'position_z', 'total_volume', 'cell_type', 'cycle_model', 'current_phase', 'elapsed_time_in_phase', 'nuclear_volume', 'cytoplasmic_volume', 'fluid_fraction', 'calcified_fraction', 'orientation_x', 'orientation_y', 'orientation_z', 'polarity', 'migration_speed', 'motility_vector_x', 'motility_vector_y', 'motility_vector_z', 'migration_bias', 'motility_bias_direction_x', 'motility_bias_direction_y', 'motility_bias_direction_z', 'persistence_time', 'motility_reserved', 'oncoprotein', 'elastic_coefficient', 'kill_rate', 'attachment_lifetime', 'attachment_rate'] # We can also get all of the cell data as a pandas DataFrame >>> cell_df = mcds.get_cell_df() >>> cell_df.head() ID position_x position_y position_z total_volume cell_type cycle_model ... 0.0 - 69.726571 - 39.020464 - 233.631789 2494.0 0.0 5.0 ... 1.0 - 69.845075 - 22.716933 - 233.592774 2494.0 0.0 5.0 ... 2.0 - 69.848915 - 6.040705 - 233.618167 2494.0 0.0 5.0 ... 3.0 - 69.845265 10.800356 - 233.616673 2494.0 0.0 5.0 ... 4.0 - 69.828161 27.324530 - 233.631579 2494.0 0.0 5.0 ... # if we want to we can also get just the subset of cells that # are in a specific voxel >>> vox_df = mcds.get_cell_df_at(x=0.0, y=550.0, z=0.0) >>> vox_df.iloc[:, :5] ID position_x position_y position_z total_volume 26718 228761.0 6.623617 536.709341 -1.282934 2454.814507 52736 270274.0 -7.990034 538.184921 9.648955 1523.386488
Examples
These examples will not be made using our toy dataset described above but will instead be made using a single timepoint dataset that can be found at:
https://sourceforge.net/projects/physicell/files/Tutorials/MultiCellDS/3D_PhysiCell_matlab_sample.zip/download
Substrate contour plot
One of the big advantages of working with PhysiCell data in python is that we have access to its plotting tools. For the sake of example let’s plot the partial pressure of oxygen throughout the computational domain along the \(z = 0\) plane. Once we’ve loaded our data by initializing a pyMCDS object, we can work entirely within python to produce the plot.
from pyMCDS import pyMCDS import numpy as np import matplotlib.pyplot as plt # load data mcds = pyMCDS('output00003696.xml', '../output') # Set our z plane and get our substrate values along it z_val = 0.00 plane_oxy = mcds.get_concentrations('oxygen', z_slice=z_val) # Get the 2D mesh for contour plotting xx, yy = mcds.get_mesh() # We want to be able to control the number of contour levels so we # need to do a little set up num_levels = 21 min_conc = plane_oxy.min() max_conc = plane_oxy.max() my_levels = np.linspace(min_conc, max_conc, num_levels) # set up the figure area and add data layers fig, ax = plt.subplot() cs = ax.contourf(xx, yy, plane_oxy, levels=my_levels) ax.contour(xx, yy, plane_oxy, color='black', levels = my_levels, linewidths=0.5) # Now we need to add our color bar cbar1 = fig.colorbar(cs, shrink=0.75) cbar1.set_label('mmHg') # Let's put the time in to make these look nice ax.set_aspect('equal') ax.set_xlabel('x (micron)') ax.set_ylabel('y (micron)') ax.set_title('oxygen (mmHg) at t = {:.1f} {:s}, z = {:.2f} {:s}'.format( mcds.get_time(), mcds.data['metadata']['time_units'], z_val, mcds.data['metadata']['spatial_units']) plt.show()
Adding a cells layer
We can also use pandas to do fairly complex selections of cells to add to our plots. Below we use pandas and the previous plot to add a cells layer.
from pyMCDS import pyMCDS import numpy as np import matplotlib.pyplot as plt # load data mcds = pyMCDS('output00003696.xml', '../output') # Set our z plane and get our substrate values along it z_val = 0.00 plane_oxy = mcds.get_concentrations('oxygen', z_slice=z_val) # Get the 2D mesh for contour plotting xx, yy = mcds.get_mesh() # We want to be able to control the number of contour levels so we # need to do a little set up num_levels = 21 min_conc = plane_oxy.min() max_conc = plane_oxy.max() my_levels = np.linspace(min_conc, max_conc, num_levels) # get our cells data and figure out which cells are in the plane cell_df = mcds.get_cell_df() ds = mcds.get_mesh_spacing() inside_plane = (cell_df['position_z'] < z_val + ds) \ & (cell_df['position_z'] > z_val - ds) plane_cells = cell_df[inside_plane] # We're going to plot two types of cells and we want it to look nice colors = ['black', 'grey'] sizes = [20, 8] labels = ['Alive', 'Dead'] # set up the figure area and add data layers fig, ax = plt.subplot() cs = ax.contourf(xx, yy, plane_oxy, levels=my_levels) # plot the cells (its hacky I know, I'll fix it!) for i in range(len(colors)): if i == 0: plot_cells = plane_cells[plane_cells['cycle_model'] < 6] if i == 1: plot_cells = plane_cells[plane_cells['cycle_model'] > 6] ax.scatter(plot_cells['position_x'].values, plot_cells['position_y'].values, facecolor='none', edgecolors=colors[i], alpha=0.6, s=sizes[i], label=labels[i]) # Now we need to add our color bar cbar1 = fig.colorbar(cs, shrink=0.75) cbar1.set_label('mmHg') # Let's put the time in to make these look nice ax.set_aspect('equal') ax.set_xlabel('x (micron)') ax.set_ylabel('y (micron)') ax.set_title('oxygen (mmHg) at t = {:.1f} {:s}, z = {:.2f} {:s}'.format( mcds.get_time(), mcds.data['metadata']['time_units'], z_val, mcds.data['metadata']['spatial_units']) ax.legend(loc='upper right') plt.show()
Future Direction
The first extension of this project will be timeseries functionality. This will provide similar data loading functionality but for a time series of MultiCell Digital Snapshots instead of simply one point in time.
from MathCancer Blog https://ift.tt/2IjFSpw from Blogger https://ift.tt/31LvTRI
0 notes
Text


Python Numpy Tutorials
#numpy tutorials#numpy for beginners#numpy arrays#what is array in numpy#numpy full array#how to create numpy full array#what is numpy full array#how to use numpy full array#uses of numpy full array#how to define the shape of numpy array#python for beginners#python full course#numpy full course#numpy python playlist#numpy playlist#complete python numpy tutorials#numpy full array function#python array#python numpy library#how to create arrays in python numpy
0 notes
Text
Python and HDF5
Python and HDF5: Unlocking Scientific Data Download Introduction Gain hands-on experience with HDF5 for storing scientific data in Python. This practical guide quickly gets you up to speed on the details, best practices, and pitfalls of using HDF5 to archive and share numerical datasets ranging in size from gigabytes to terabytes. Through real-world examples and practical exercises, you’ll explore topics such as scientific datasets, hierarchically organized groups, user-defined metadata, and interoperable files. Examples are applicable for users of both Python 2 and Python 3. If you’re familiar with the basics of Python data analysis, this is an ideal introduction to HDF5. + Get set up with HDF5 tools and create your first HDF5 file + Work with datasets by learning the HDF5 Dataset object + Understand advanced features like dataset chunking and compression + Learn how to work with HDF5’s hierarchical structure, using groups + Create self-describing files by adding metadata with HDF5 attributes + Take advantage of HDF5’s type system to create interoperable files + Express relationships among data with references, named types, and dimension scales + Discover how Python mechanisms for writing parallel code interact with HDF5 Over the past several years, Python has emerged as a credible alternative to scientific analysis environments like IDL or MATLAB. Stable core packages now exist for han‐ dling numerical arrays (NumPy), analysis (SciPy), and plotting (matplotlib). A huge selection of more specialized software is also available, reducing the amount of work necessary to write scientific code while also increasing the quality of results. As Python is increasingly used to handle large numerical datasets, more emphasis has been placed on the use of standard formats for data storage and communication. HDF5, the most recent version of the “Hierarchical Data Format” originally developed at the National Center for Supercomputing Applications (NCSA), has rapidly emerged as the mechanism of choice for storing scientific data in Python. At the same time, many researchers who use (or are interested in using) HDF5 have been drawn to Python for its ease of use and rapid development capabilities. This book provides an introduction to using HDF5 from Python, and is designed to be useful to anyone with a basic background in Python data analysis. Only familiarity with Python and NumPy is assumed. Special emphasis is placed on the native HDF5 feature set, rather than higher-level abstractions on the Python side, to make the book as useful as possible for creating portable files. Finally, this book is intended to support both users of Python 2 and Python 3. While the examples are written for Python 2, any differences that may trip you up are noted in the text. Organization Chapter 1 Introduction + Python and HDF5 + What Exactly Is HDF5? Chapter 2 Getting Started + HDF5 Basics + Setting Up + The HDF5 Tools + Your First HDF5 File Chapter 3 Working with Datasets + Dataset Basics + Reading and Writing Data + Resizing Datasets Chapter 4 How Chunking and Compression Can Help You + Contiguous Storage + Chunked Storage + Setting the Chunk Shape + Performance Example: Resizable Datasets + Filters and Compression + Other Filters + Third-Party Filters Chapter 5 Groups, Links, and Iteration: The "H" in HDF5 + The Root Group and Subgroups + Group Basics + Working with Links + Iteration and Containership + Multilevel Iteration with the Visitor Pattern + Copying Objects + Object Comparison and Hashing Chapter 6 Storing Metadata with Attributes + Attribute Basics + Real-World Example: Accelerator Particle Database Chapter 7 More About Types + The HDF5 Type System + Integers and Floats + Fixed-Length Strings + Variable-Length Strings + Compound Types + Complex Numbers + Enumerated Types + Booleans + The array Type + Opaque Types + Dates and Times Chapter 8 Organizing Data with References, Types, and Dimension Scales + Object References + Region References + Named Types + Dimension Scales Chapter 9 Concurrency: Parallel HDF5, Threading, and Multiprocessing + Python Parallel Basics + Threading + Multiprocessing + MPI and Parallel HDF5 Chapter 10 Next Steps + Asking for Help + Contributing Via TimoBook
0 notes
Text
TensorFlow Basics
Computation Graph
If your aspirations are to define a neural net in Tensorflow, than your workflow would be to first construct the network by defining all computations. Each single computation adds a node to the so called Computation Graph. Providing data to a Session (will come to that later) will ask TensorFlow to executed the giving graph.
TensorFlow comes with a neat build in tool called the TensorFlow Graph visulaization that helps you to keep and insight in what computations is actually defined in a computation graph. A computation graph can get hairy very quickly as one adds many nodes to it, therefore the grpah visualization tool has been implemented which makes it faily easy to understand how the data flows to the graph at any given time.
Session Management
After the computation graph has been defined one has to take care of the Tensorflow Session Management. A Session is neccessary to execute the predefined computation graph. A node in a computation graph has no state before it is evaluated in a Session.
import tensorflow as tf a = tf.constant(1.0) b = tf.constatn(2.0) c = a * b print(c) #=> Tensor("mul:0", shape=(), dtype=float32) with tf.Session() as sess: print(sess.run(c)) print(c.eval()) #=> 30.0 #=> 30.0
The line c = a * b just describes how to Tensorflow constants should be manipulated without actually doing it. To run the computation, the note has to be evaluated in a Tensorflow Session. The same variable can have to completely different values in two different sessions (e.g depending on the specific input values ...).
To make life easy, especially when you are experimenting with Tensoflow in an iPython notebook, Tensorflow comes with the concept of an Interactive Session, which keeps the same Session open by default.This avoids having to keep a variable holding the session.
import tensorflow as tf sess = tf.InteractiveSession() a =tf.Variable(1) a.initializer.run() #No need to refer to sess print(a.eval()) #WORKS #=> 1
One important thing to keep in mind is: "A session may own resources, such as variables, queues, and readers. It is important to release these resources when they are no longer required. To do this, either invoke the close() method on the session, or use the session as a context manager."TF documentation
TensorFlow Variables
In TensorFlow there are two slighltly different concepts of variables. There a constants and variables. The big difference between those to options is that a constant does not neccessariliy be initialized while a variable must be.
Constants
import tensorflow as tf constant_zero = tf.constant(0) # constant with tf.Session() as sess: print(sess.run(constant_zero)) #=> WORKS
Variabels
"When you train a model, you use variables to hold and update parameters. Variables are in-memory buffers containing tensors. They must be explicitly initialized and can be saved to disk during and after training. You can later restore saved values to exercise or analyze the model." (TF documentation)
import tensorflow as tf constant_zero = tf.constant(0) # constant variable_zero = tf.Variable(0) # variable with tf.Session() as sess: print(sess.run(constant_zero)) #=> WORKS print(sess.run(variable_zero)) #=> ERROR! sess.run(tf.global_variables_initializer()) print(sess.run(variable_zero)) #=> WORKS
Note that a variable usually is defined by not only giving it a value but also a name:
variable_zero = tf.Variable(0, name="zero")
The name "zero" is the entity that the variable has been given in the Tensorflow namespace, while variable_zero is the local entity that the variable is being given in the python namespace. When referring to this variable in the Tensorflow computation graph one uses "zero", but on the other hand if one wants to print the variable in the python script one refers to it as variable_zero.
Feeds and Fetches
When a computation graph is defined, there are two different kinds of computations that can be performed on it: Feeds and Fetches. A Feed places data in to the computation graph while a Fetch extracts data from such.
The previously defined operations c.eval() as well as sess.run(c) are both TensorFlow Fetch operataions.
To input data into the computation graph one uses the very simple command called tf.convert_to_tensor():
import tensorflow as tf import numpy as np numpy_var = np.zeros((2,2)) tensor = tf.convert_to_tensor(numpy_var) with tf.Session() as sess: print(tensor.eval()) #=> [[ 0. 0.] # [ 0. 0.]]
It is not possible to evaluate a NumPy array in a Tensorflow session (AttributeError: 'numpy.ndarray' object has no attribute 'eval').
First the NumPy array has to be converted into a Tensorflow Tensor (which automatically creates a TF node that is inserted into the computation graph => Feed operation). The Tensor can the be evaluated in a Tensorflow session which in this case retuns [[ 0. 0.] [ 0. 0.]] as expected.
0 notes
Link
via www.pyimagesearch.com
Continuing our series of blog posts on facial landmarks, today we are going to discuss face alignment, the process of:
Identifying the geometric structure of faces in digital images.
Attempting to obtain a canonical alignment of the face based on translation, scale, and rotation.
There are many forms of face alignment.
Some methods try to impose a (pre-defined) 3D model and then apply a transform to the input image such that the landmarks on the input face match the landmarks on the 3D model.
Other, more simplistic methods (like the one discussed in this blog post), rely only on the facial landmarks themselves (in particular, the eye regions) to obtain a normalized rotation, translation, and scale representation of the face.
The reason we perform this normalization is due to the fact that many facial recognition algorithms, including Eigenfaces, LBPs for face recognition, Fisherfaces, and deep learning/metric methods can all benefit from applying facial alignment before trying to identify the face.
Thus, face alignment can be seen as a form of “data normalization”. Just as you may normalize a set of feature vectors via zero centering or scaling to unit norm prior to training a machine learning model, it’s very common to align the faces in your dataset before training a face recognizer.
By performing this process, you’ll enjoy higher accuracy from your face recognition models.
Note: If you’re interested in learning more about creating your own custom face recognizers, be sure to refer to the PyImageSearch Gurus course where I provide detailed tutorials on face recognition.
To learn more about face alignment and normalization, just keep reading.
Looking for the source code to this post? Jump right to the downloads section.
Face alignment with OpenCV and Python
The purpose of this blog post is to demonstrate how to align a face using OpenCV, Python, and facial landmarks.
Given a set of facial landmarks (the input coordinates) our goal is to warp and transform the image to an output coordinate space.
In this output coordinate space, all faces across an entire dataset should:
Be centered in the image.
Be rotated that such the eyes lie on a horizontal line (i.e., the face is rotated such that the eyes lie along the same y-coordinates).
Be scaled such that the size of the faces are approximately identical.
To accomplish this, we’ll first implement a dedicated Python class to align faces using an affine transformation. I’ve already implemented this FaceAligner class in imutils.
Note: Affine transformations are used for rotating, scaling, translating, etc. We can pack all three of the above requirements into a single
cv2.warpAffine
call; the trick is creating the rotation matrix,
M
.
We’ll then create an example driver Python script to accept an input image, detect faces, and align them.
Finally, we’ll review the results from our face alignment with OpenCV process.
Implementing our face aligner
The face alignment algorithm itself is based on Chapter 8 of Mastering OpenCV with Practical Computer Vision Projects (Baggio, 2012), which I highly recommend if you have a C++ background or interest. The book provides open-access code samples on GitHub.
Let’s get started by examining our
FaceAligner
implementation and understanding what’s going on under the hood.
# import the necessary packages from .helpers import FACIAL_LANDMARKS_IDXS from .helpers import shape_to_np import numpy as np import cv2 class FaceAligner: def __init__(self, predictor, desiredLeftEye=(0.35, 0.35), desiredFaceWidth=256, desiredFaceHeight=None): # store the facial landmark predictor, desired output left # eye position, and desired output face width + height self.predictor = predictor self.desiredLeftEye = desiredLeftEye self.desiredFaceWidth = desiredFaceWidth self.desiredFaceHeight = desiredFaceHeight # if the desired face height is None, set it to be the # desired face width (normal behavior) if self.desiredFaceHeight is None: self.desiredFaceHeight = self.desiredFaceWidth
Lines 2-5 handle our imports. To read about facial landmarks and our associated helper functions, be sure to check out this previous post.
On Line 7, we begin our
FaceAligner
class with our constructor being defined on Lines 8-20.
Our constructor has 4 parameters:
predictor
: The facial landmark predictor model.
desiredLeftEye
: An optional (x, y) tuple with the default shown, specifying the desired output left eye position. For this variable, it is common to see percentages within the range of 20-40%. These percentages control how much of the face is visible after alignment. The exact percentages used will vary on an application-to-application basis. With 20% you’ll basically be getting a “zoomed in” view of the face, whereas with larger values the face will appear more “zoomed out.”
desiredFaceWidth
: Another optional parameter that defines our desired face with in pixels. We default this value to 256 pixels.
desiredFaceHeight
: The final optional parameter specifying our desired face height value in pixels.
Each of these parameters is set to a corresponding instance variable on Lines 12-15.
Next, let’s decide whether we want a square image of a face, or something rectangular. Lines 19 and 20 check if the
desiredFaceHeight
is
None
, and if so, we set it to the
desiredFaceWidth
, meaning that the face is square. A square image is the typical case. Alternatively, we can specify different values for both
desiredFaceWidth
and
desiredFaceHeight
to obtain a rectangular region of interest.
Now that we have constructed our
FaceAligner
object, we will next define a function which aligns the face.
This function is a bit long, so I’ve broken it up into 5 code blocks to make it more digestible:
# import the necessary packages from .helpers import FACIAL_LANDMARKS_IDXS from .helpers import shape_to_np import numpy as np import cv2 class FaceAligner: def __init__(self, predictor, desiredLeftEye=(0.35, 0.35), desiredFaceWidth=256, desiredFaceHeight=None): # store the facial landmark predictor, desired output left # eye position, and desired output face width + height self.predictor = predictor self.desiredLeftEye = desiredLeftEye self.desiredFaceWidth = desiredFaceWidth self.desiredFaceHeight = desiredFaceHeight # if the desired face height is None, set it to be the # desired face width (normal behavior) if self.desiredFaceHeight is None: self.desiredFaceHeight = self.desiredFaceWidth def align(self, image, gray, rect): # convert the landmark (x, y)-coordinates to a NumPy array shape = self.predictor(gray, rect) shape = shape_to_np(shape) # extract the left and right eye (x, y)-coordinates (lStart, lEnd) = FACIAL_LANDMARKS_IDXS["left_eye"] (rStart, rEnd) = FACIAL_LANDMARKS_IDXS["right_eye"] leftEyePts = shape[lStart:lEnd] rightEyePts = shape[rStart:rEnd]
Beginning on Line 22, we define the align function which accepts three parameters:
image
: The RGB input image.
gray
: The grayscale input image.
rect
: The bounding box rectangle produced by dlib’s HOG face detector.
On Lines 24 and 25, we apply dlib’s facial landmark predictor and convert the landmarks into (x, y)-coordinates in NumPy format.
Next, on Lines 28 and 29 we read the
left_eye
and
right_eye
regions from the
FACIAL_LANDMARK_IDXS
dictionary, found in the
helpers.py
script. These 2-tuple values are stored in left/right eye starting and ending indices.
The
leftEyePts
and
rightEyePts
are extracted from the shape list using the starting and ending indices on Lines 30 and 31.
Next, let’s will compute the center of each eye as well as the angle between the eye centroids.
This angle serves as the key component for aligning our image.
The angle of the green line between the eyes, shown in Figure 1 below, is the one that we are concerned about.
Figure 1: Computing the angle between two eyes for face alignment.
To see how the angle is computed, refer to the code block below:
# import the necessary packages from .helpers import FACIAL_LANDMARKS_IDXS from .helpers import shape_to_np import numpy as np import cv2 class FaceAligner: def __init__(self, predictor, desiredLeftEye=(0.35, 0.35), desiredFaceWidth=256, desiredFaceHeight=None): # store the facial landmark predictor, desired output left # eye position, and desired output face width + height self.predictor = predictor self.desiredLeftEye = desiredLeftEye self.desiredFaceWidth = desiredFaceWidth self.desiredFaceHeight = desiredFaceHeight # if the desired face height is None, set it to be the # desired face width (normal behavior) if self.desiredFaceHeight is None: self.desiredFaceHeight = self.desiredFaceWidth def align(self, image, gray, rect): # convert the landmark (x, y)-coordinates to a NumPy array shape = self.predictor(gray, rect) shape = shape_to_np(shape) # extract the left and right eye (x, y)-coordinates (lStart, lEnd) = FACIAL_LANDMARKS_IDXS["left_eye"] (rStart, rEnd) = FACIAL_LANDMARKS_IDXS["right_eye"] leftEyePts = shape[lStart:lEnd] rightEyePts = shape[rStart:rEnd] # compute the center of mass for each eye leftEyeCenter = leftEyePts.mean(axis=0).astype("int") rightEyeCenter = rightEyePts.mean(axis=0).astype("int") # compute the angle between the eye centroids dY = rightEyeCenter[1] - leftEyeCenter[1] dX = rightEyeCenter[0] - leftEyeCenter[0] angle = np.degrees(np.arctan2(dY, dX)) - 180
On Lines 34 and 35 we compute the centroid, also known as the center of mass, of each eye by averaging all (x, y) points of each eye, respectively.
Given the eye centers, we can compute differences in (x, y)-coordinates and take the arc-tangent to obtain angle of rotation between eyes.
This angle will allow us to correct for rotation.
To determine the angle, we start by computing the delta in the y-direction,
dY
. This is done by finding the difference between the
rightEyeCenter
and the
leftEyeCenter
on Line 38.
Similarly, we compute
dX
, the delta in the x-direction on Line 39.
Next, on Line 40, we compute the angle of the face rotation. We use NumPy’s
arctan2
function with arguments
dY
and
dX
, followed by converting to degrees while subtracting 180 to obtain the angle.
In the following code block we compute the desired right eye coordinate (as a function of the left eye placement) as well as calculating the scale of the new resulting image.
# import the necessary packages from .helpers import FACIAL_LANDMARKS_IDXS from .helpers import shape_to_np import numpy as np import cv2 class FaceAligner: def __init__(self, predictor, desiredLeftEye=(0.35, 0.35), desiredFaceWidth=256, desiredFaceHeight=None): # store the facial landmark predictor, desired output left # eye position, and desired output face width + height self.predictor = predictor self.desiredLeftEye = desiredLeftEye self.desiredFaceWidth = desiredFaceWidth self.desiredFaceHeight = desiredFaceHeight # if the desired face height is None, set it to be the # desired face width (normal behavior) if self.desiredFaceHeight is None: self.desiredFaceHeight = self.desiredFaceWidth def align(self, image, gray, rect): # convert the landmark (x, y)-coordinates to a NumPy array shape = self.predictor(gray, rect) shape = shape_to_np(shape) # extract the left and right eye (x, y)-coordinates (lStart, lEnd) = FACIAL_LANDMARKS_IDXS["left_eye"] (rStart, rEnd) = FACIAL_LANDMARKS_IDXS["right_eye"] leftEyePts = shape[lStart:lEnd] rightEyePts = shape[rStart:rEnd] # compute the center of mass for each eye leftEyeCenter = leftEyePts.mean(axis=0).astype("int") rightEyeCenter = rightEyePts.mean(axis=0).astype("int") # compute the angle between the eye centroids dY = rightEyeCenter[1] - leftEyeCenter[1] dX = rightEyeCenter[0] - leftEyeCenter[0] angle = np.degrees(np.arctan2(dY, dX)) - 180 # compute the desired right eye x-coordinate based on the # desired x-coordinate of the left eye desiredRightEyeX = 1.0 - self.desiredLeftEye[0] # determine the scale of the new resulting image by taking # the ratio of the distance between eyes in the *current* # image to the ratio of distance between eyes in the # *desired* image dist = np.sqrt((dX ** 2) + (dY ** 2)) desiredDist = (desiredRightEyeX - self.desiredLeftEye[0]) desiredDist *= self.desiredFaceWidth scale = desiredDist / dist
On Line 44, we calculate the desired right eye based upon the desired left eye x-coordinate. We subtract
self.desiredLeftEye[0]
from
1.0
because the
desiredRightEyeX
value should be equidistant from the right edge of the image as the corresponding left eye x-coordinate is from its left edge.
We can then determine the
scale
of the face by taking the ratio of the distance between the eyes in the current image to the distance between eyes in the desired image
First, we compute the Euclidean distance ratio,
dist
, on Line 50.
Next, on Line 51, using the difference between the right and left eye x-values we compute the desired distance,
desiredDist
.
We update the
desiredDist
by multiplying it by the
desiredFaceWidth
on Line 52. This essentially scales our eye distance based on the desired width.
Finally, our scale is computed by dividing
desiredDist
by our previously calculated
dist
.
Now that we have our rotation
angle
and
scale
, we will need to take a few steps before we compute the affine transformation. This includes finding the midpoint between the eyes as well as calculating the rotation matrix and updating its translation component:
# import the necessary packages from .helpers import FACIAL_LANDMARKS_IDXS from .helpers import shape_to_np import numpy as np import cv2 class FaceAligner: def __init__(self, predictor, desiredLeftEye=(0.35, 0.35), desiredFaceWidth=256, desiredFaceHeight=None): # store the facial landmark predictor, desired output left # eye position, and desired output face width + height self.predictor = predictor self.desiredLeftEye = desiredLeftEye self.desiredFaceWidth = desiredFaceWidth self.desiredFaceHeight = desiredFaceHeight # if the desired face height is None, set it to be the # desired face width (normal behavior) if self.desiredFaceHeight is None: self.desiredFaceHeight = self.desiredFaceWidth def align(self, image, gray, rect): # convert the landmark (x, y)-coordinates to a NumPy array shape = self.predictor(gray, rect) shape = shape_to_np(shape) # extract the left and right eye (x, y)-coordinates (lStart, lEnd) = FACIAL_LANDMARKS_IDXS["left_eye"] (rStart, rEnd) = FACIAL_LANDMARKS_IDXS["right_eye"] leftEyePts = shape[lStart:lEnd] rightEyePts = shape[rStart:rEnd] # compute the center of mass for each eye leftEyeCenter = leftEyePts.mean(axis=0).astype("int") rightEyeCenter = rightEyePts.mean(axis=0).astype("int") # compute the angle between the eye centroids dY = rightEyeCenter[1] - leftEyeCenter[1] dX = rightEyeCenter[0] - leftEyeCenter[0] angle = np.degrees(np.arctan2(dY, dX)) - 180 # compute the desired right eye x-coordinate based on the # desired x-coordinate of the left eye desiredRightEyeX = 1.0 - self.desiredLeftEye[0] # determine the scale of the new resulting image by taking # the ratio of the distance between eyes in the *current* # image to the ratio of distance between eyes in the # *desired* image dist = np.sqrt((dX ** 2) + (dY ** 2)) desiredDist = (desiredRightEyeX - self.desiredLeftEye[0]) desiredDist *= self.desiredFaceWidth scale = desiredDist / dist # compute center (x, y)-coordinates (i.e., the median point) # between the two eyes in the input image eyesCenter = ((leftEyeCenter[0] + rightEyeCenter[0]) // 2, (leftEyeCenter[1] + rightEyeCenter[1]) // 2) # grab the rotation matrix for rotating and scaling the face M = cv2.getRotationMatrix2D(eyesCenter, angle, scale) # update the translation component of the matrix tX = self.desiredFaceWidth * 0.5 tY = self.desiredFaceHeight * self.desiredLeftEye[1] M[0, 2] += (tX - eyesCenter[0]) M[1, 2] += (tY - eyesCenter[1])
On Lines 57 and 58, we compute
eyesCenter
, the midpoint between the left and right eyes. This will be used in our rotation matrix calculation. In essence, this midpoint is at the top of the nose and is the point at which we will rotate the face around:
Figure 2: Computing the midpoint (blue) between two eyes. This will serve as the (x, y)-coordinate in which we rotate the face around.
To compute our rotation matrix,
M
, we utilize
cv2.getRotationMatrix2D
specifying
eyesCenter
,
angle
, and
scale
(Line 61). Each of these three values have been previously computed, so refer back to Line 40, Line 53, and Line 57 as needed.
A description of the parameters to
cv2.getRotationMatrix2D
follow:
eyesCenter
: The midpoint between the eyes is the point at which we will rotate the face around.
angle
: The angle we will rotate the face to to ensure the eyes lie along the same horizontal line.
scale
: The percentage that we will scale up or down the image, ensuring that the image scales to the desired size.
Now we must update the translation component of the matrix so that the face is still in the image after the affine transform.
On Line 64, we take half of the
desiredFaceWidth
and store the value as
tX
, the translation in the x-direction.
To compute
tY
, the translation in the y-direction, we multiply the
desiredFaceHeight
by the desired left eye y-value,
desiredLeftEye[1]
.
Using
tX
and
tY
, we update the translation component of the matrix by subtracting each value from their corresponding eyes midpoint value,
eyesCenter
(Lines 66 and 67).
We can now apply our affine transformation to align the face:
# import the necessary packages from .helpers import FACIAL_LANDMARKS_IDXS from .helpers import shape_to_np import numpy as np import cv2 class FaceAligner: def __init__(self, predictor, desiredLeftEye=(0.35, 0.35), desiredFaceWidth=256, desiredFaceHeight=None): # store the facial landmark predictor, desired output left # eye position, and desired output face width + height self.predictor = predictor self.desiredLeftEye = desiredLeftEye self.desiredFaceWidth = desiredFaceWidth self.desiredFaceHeight = desiredFaceHeight # if the desired face height is None, set it to be the # desired face width (normal behavior) if self.desiredFaceHeight is None: self.desiredFaceHeight = self.desiredFaceWidth def align(self, image, gray, rect): # convert the landmark (x, y)-coordinates to a NumPy array shape = self.predictor(gray, rect) shape = shape_to_np(shape) # extract the left and right eye (x, y)-coordinates (lStart, lEnd) = FACIAL_LANDMARKS_IDXS["left_eye"] (rStart, rEnd) = FACIAL_LANDMARKS_IDXS["right_eye"] leftEyePts = shape[lStart:lEnd] rightEyePts = shape[rStart:rEnd] # compute the center of mass for each eye leftEyeCenter = leftEyePts.mean(axis=0).astype("int") rightEyeCenter = rightEyePts.mean(axis=0).astype("int") # compute the angle between the eye centroids dY = rightEyeCenter[1] - leftEyeCenter[1] dX = rightEyeCenter[0] - leftEyeCenter[0] angle = np.degrees(np.arctan2(dY, dX)) - 180 # compute the desired right eye x-coordinate based on the # desired x-coordinate of the left eye desiredRightEyeX = 1.0 - self.desiredLeftEye[0] # determine the scale of the new resulting image by taking # the ratio of the distance between eyes in the *current* # image to the ratio of distance between eyes in the # *desired* image dist = np.sqrt((dX ** 2) + (dY ** 2)) desiredDist = (desiredRightEyeX - self.desiredLeftEye[0]) desiredDist *= self.desiredFaceWidth scale = desiredDist / dist # compute center (x, y)-coordinates (i.e., the median point) # between the two eyes in the input image eyesCenter = ((leftEyeCenter[0] + rightEyeCenter[0]) // 2, (leftEyeCenter[1] + rightEyeCenter[1]) // 2) # grab the rotation matrix for rotating and scaling the face M = cv2.getRotationMatrix2D(eyesCenter, angle, scale) # update the translation component of the matrix tX = self.desiredFaceWidth * 0.5 tY = self.desiredFaceHeight * self.desiredLeftEye[1] M[0, 2] += (tX - eyesCenter[0]) M[1, 2] += (tY - eyesCenter[1]) # apply the affine transformation (w, h) = (self.desiredFaceWidth, self.desiredFaceHeight) output = cv2.warpAffine(image, M, (w, h), flags=cv2.INTER_CUBIC) # return the aligned face return output
For convenience we store the
desiredFaceWidth
and
desiredFaceHeight
into
w
and
h
respectively (Line 70).
Then we perform our last step on Lines 70 and 71 by making a call to
cv2.warpAffine
. This function call requires 3 parameters and 1 optional parameter:
image
: The face image.
M
: The translation, rotation, and scaling matrix.
(w, h)
: The desired width and height of the output face.
flags
: The interpolation algorithm to use for the warp, in this case
INTER_CUBIC
. To read about the other possible flags and image transformations, please consult the OpenCV documentation.
Finally, we return the aligned face on Line 75.
Aligning faces with OpenCV and Python
Now let’s put this alignment class to work with a simple driver script. Open up a new file, name it
align_faces.py
, and let’s get to coding.
# import the necessary packages from imutils.face_utils import FaceAligner from imutils.face_utils import rect_to_bb import argparse import imutils import dlib import cv2 # construct the argument parser and parse the arguments ap = argparse.ArgumentParser() ap.add_argument("-p", "--shape-predictor", required=True, help="path to facial landmark predictor") ap.add_argument("-i", "--image", required=True, help="path to input image") args = vars(ap.parse_args())
On Lines 2-7 we import required packages.
If you do not have
imutils
and/or
dlib
installed on your system, then make sure you install/upgrade them via
pip
:
$ pip install --upgrade imutils $ pip install --upgrad dlib
Note: If you are using Python virtual environments (as all of my OpenCV install tutorials do), make sure you use the
workon
command to access your virtual environment first, and then install/upgrade
imutils
and
dlib
.
Using
argparse
on Lines 10-15, we specify 2 required command line arguments:
--shape-predictor
: The dlib facial landmark predictor.
--image
: The image containing faces.
In the next block of code we initialize our HOG-based detector (Histogram of Oriented Gradients), our facial landmark predictor, and our face aligner:
# import the necessary packages from imutils.face_utils import FaceAligner from imutils.face_utils import rect_to_bb import argparse import imutils import dlib import cv2 # construct the argument parser and parse the arguments ap = argparse.ArgumentParser() ap.add_argument("-p", "--shape-predictor", required=True, help="path to facial landmark predictor") ap.add_argument("-i", "--image", required=True, help="path to input image") args = vars(ap.parse_args()) # initialize dlib's face detector (HOG-based) and then create # the facial landmark predictor and the face aligner detector = dlib.get_frontal_face_detector() predictor = dlib.shape_predictor(args["shape_predictor"]) fa = FaceAligner(predictor, desiredFaceWidth=256)
Line 19 initializes our detector object using dlib’s
get_frontal_face_detector
.
On Line 20 we instantiate our facial landmark predictor using,
--shape-predictor
, the path to dlib’s pre-trained predictor.
We make use of the
FaceAligner
class that we just built in the previous section by initializing a an object,
fa
, on Line 21. We specify a face width of 256 pixels.
Next, let’s load our image and prepare it for face detection:
# import the necessary packages from imutils.face_utils import FaceAligner from imutils.face_utils import rect_to_bb import argparse import imutils import dlib import cv2 # construct the argument parser and parse the arguments ap = argparse.ArgumentParser() ap.add_argument("-p", "--shape-predictor", required=True, help="path to facial landmark predictor") ap.add_argument("-i", "--image", required=True, help="path to input image") args = vars(ap.parse_args()) # initialize dlib's face detector (HOG-based) and then create # the facial landmark predictor and the face aligner detector = dlib.get_frontal_face_detector() predictor = dlib.shape_predictor(args["shape_predictor"]) fa = FaceAligner(predictor, desiredFaceWidth=256) # load the input image, resize it, and convert it to grayscale image = cv2.imread(args["image"]) image = imutils.resize(image, width=800) gray = cv2.cvtColor(image, cv2.COLOR_BGR2GRAY) # show the original input image and detect faces in the grayscale # image cv2.imshow("Input", image) rects = detector(gray, 2)
On Line 24, we load our image specified by the command line argument
–-image
. We resize the image maintaining the aspect ratio on Line 25 to have a width of 800 pixels. We then convert the image to grayscale on Line 26.
Detecting faces in the input image is handled on Line 31 where we apply dlib’s face detector. This function returns
rects
, a list of bounding boxes around the faces our detector has found.
In the next block, we iterate through
rects
, align each face, and display the original and aligned images.
# import the necessary packages from imutils.face_utils import FaceAligner from imutils.face_utils import rect_to_bb import argparse import imutils import dlib import cv2 # construct the argument parser and parse the arguments ap = argparse.ArgumentParser() ap.add_argument("-p", "--shape-predictor", required=True, help="path to facial landmark predictor") ap.add_argument("-i", "--image", required=True, help="path to input image") args = vars(ap.parse_args()) # initialize dlib's face detector (HOG-based) and then create # the facial landmark predictor and the face aligner detector = dlib.get_frontal_face_detector() predictor = dlib.shape_predictor(args["shape_predictor"]) fa = FaceAligner(predictor, desiredFaceWidth=256) # load the input image, resize it, and convert it to grayscale image = cv2.imread(args["image"]) image = imutils.resize(image, width=800) gray = cv2.cvtColor(image, cv2.COLOR_BGR2GRAY) # show the original input image and detect faces in the grayscale # image cv2.imshow("Input", image) rects = detector(gray, 2) # loop over the face detections for rect in rects: # extract the ROI of the *original* face, then align the face # using facial landmarks (x, y, w, h) = rect_to_bb(rect) faceOrig = imutils.resize(image[y:y + h, x:x + w], width=256) faceAligned = fa.align(image, gray, rect) # display the output images cv2.imshow("Original", faceOrig) cv2.imshow("Aligned", faceAligned) cv2.waitKey(0)
We begin our loop on Line 34.
For each bounding box
rect
predicted by dlib we convert it to the format
(x, y, w, h)
(Line 37).
Subsequently, we resize the box to a width of 256 pixels, maintaining the aspect ratio, on Line 38. We store this original, but resized image, as
faceOrig
.
On Line 39, we align the image, specifying our image, grayscale image, and rectangle.
Finally, Lines 42 and 43 display the original and corresponding aligned face image to the screen in respective windows.
On Line 44, we wait for the user to press a key with either window in focus, before displaying the next original/aligned image pair.
The process on Lines 35-44 is repeated for all faces detected, then the script exits.
To see our face aligner in action, head to next section.
Face alignment results
Let’s go ahead and apply our face aligner to some example images. Make sure you use the “Downloads” section of this blog post to download the source code + example images.
After unpacking the archive, execute the following command:
$ python align_faces.py \ --shape-predictor shape_predictor_68_face_landmarks.dat \ --image images/example_01.jpg
From there you’ll see the following input image, a photo of myself and my financée, Trisha:
Figure 3: An input image to our OpenCV face aligner.
This image contains two faces, therefore we’ll be performing two facial alignments.
The first is seen below:
Figure 4: Aligning faces with OpenCV.
On the left we have the original detected face. The aligned face is then displayed on the right.
Now for Trisha’s face:
Figure 5: Facial alignment with OpenCV and Python.
Notice how after facial alignment both of our faces are the same scale and the eyes appear in the same output (x, y)-coordinates.
Let’s try a second example:
$ python align_faces.py \ --shape-predictor shape_predictor_68_face_landmarks.dat \ --image images/example_02.jpg
Here I am enjoying a glass of wine on Thanksgiving morning:
Figure 6: An input image to our face aligner.
After detecting my face, it is then aligned as the following figure demonstrates:
Figure 7: Using facial landmarks to align faces in images.
Here is a third example, this one of myself and my father last spring after cooking up a batch of soft shell crabs:
$ python align_faces.py \ --shape-predictor shape_predictor_68_face_landmarks.dat \ --image images/example_03.jpg
Figure 8: Another example input to our face aligner.
My father’s face is first aligned:
Figure 9: Applying facial alignment using OpenCV and Python.
Followed by my own:
Figure 10: Using face alignment to obtain canonical representations of faces.
The fourth example is a photo of my grandparents the last time they visited North Carolina:
$ python align_faces.py \ --shape-predictor shape_predictor_68_face_landmarks.dat \ --image images/example_04.jpg
Figure 11: Inputting an image to our face alignment algorithm.
My grandmother’s face is aligned first:
Figure 12: Performing face alignment using computer vision.
And then my grandfather’s:
Figure 13: Face alignment in unaffected by the person in the photo wearing glasses.
Despite both of them wearing glasses the faces are correctly aligned.
Let’s do one final example:
$ python align_faces.py \ --shape-predictor shape_predictor_68_face_landmarks.dat \ --image images/example_05.jpg
Figure 14: The final example input image to our face aligner.
After applying face detection, Trisha’s face is aligned first:
Figure 15: Facial alignment using facial landmarks.
And then my own:
Figure 16: Face alignment still works even if the input face is rotated.
The rotation angle of my face is detected and corrected, followed by being scaled to the appropriate size.
To demonstrate that this face alignment method does indeed (1) center the face, (2) rotate the face such that the eyes lie along a horizontal line, and (3) scale the faces such that they are approximately identical in size, I’ve put together a GIF animation that you can see below:
Figure 17: An animation demonstrating face alignment across multiple images.
As you can see, the eye locations and face sizes are near identical for every input image.
Summary
In today’s post, we learned how to apply facial alignment with OpenCV and Python. Facial alignment is a normalization technique, often used to improve the accuracy of face recognition algorithms, including deep learning models.
The goal of facial alignment is to transform an input coordinate space to output coordinate space, such that all faces across an entire dataset should:
Be centered in the image.
Be rotated that such the eyes lie on a horizontal line (i.e., the face is rotated such that the eyes lie along the same y-coordinates).
Be scaled such that the size of the faces are approximately identical.
All three goals can be accomplished using an affine transformation. The trick is determining the components of the transformation matrix,
M
.
Our facial alignment algorithm hinges on knowing the (x, y)-coordinates of the eyes. In this blog post we used dlib, but you can use other facial landmark libraries as well — the same techniques apply.
Facial landmarks tend to work better than Haar cascades or HOG detectors for facial alignment since we obtain a more precise estimation to eye location (rather than just a bounding box).
If you’re interested in learning more about face recognition and object detection, be sure to take a look at the PyImageSearch Gurus course where I have over 25+ lessons on these topics.
Downloads:
If you would like to download the code and images used in this post, please enter your email address in the form below. Not only will you get a .zip of the code, I’ll also send you a FREE 11-page Resource Guide on Computer Vision and Image Search Engines, including exclusive techniques that I don’t post on this blog! Sound good? If so, enter your email address and I’ll send you the code immediately!
Email address:
The post Face Alignment with OpenCV and Python appeared first on PyImageSearch.
0 notes
Text
A Gentle Introduction to Channels First and Channels Last Image Formats for Deep Learning
Color images have height, width, and color channel dimensions.
When represented as three-dimensional arrays, the channel dimension for the image data is last by default, but may be moved to be the first dimension, often for performance-tuning reasons.
The use of these two “channel ordering formats” and preparing data to meet a specific preferred channel ordering can be confusing to beginners.
In this tutorial, you will discover channel ordering formats, how to prepare and manipulate image data to meet formats, and how to configure the Keras deep learning library for different channel orderings.
After completing this tutorial, you will know:
The three-dimensional array structure of images and the channels first and channels last array formats.
How to add a channels dimension and how to convert images between the channel formats.
How the Keras deep learning library manages a preferred channel ordering and how to change and query this preference.
Let’s get started.
Tutorial Overview
This tutorial is divided into three parts; they are:
Images as 3D Arrays
Manipulating Image Channels
Keras Channel Ordering
Images as 3D Arrays
An image can be stored as a three-dimensional array in memory.
Typically, the image format has one dimension for rows (height), one for columns (width) and one for channels.
If the image is black and white (grayscale), the channels dimension may not be explicitly present, e.g. there is one unsigned integer pixel value for each (row, column) coordinate in the image.
Colored images typically have three channels, for the pixel value at the (row, column) coordinate for the red, green, and blue components.
Deep learning neural networks require that image data be provided as three-dimensional arrays.
This applies even if your image is grayscale. In this case, the additional dimension for the single color channel must be added.
There are two ways to represent the image data as a three dimensional array. The first involves having the channels as the last or third dimension in the array. This is called “channels last“. The second involves having the channels as the first dimension in the array, called “channels first“.
Channels Last. Image data is represented in a three-dimensional array where the last channel represents the color channels, e.g. [rows][cols][channels].
Channels First. Image data is represented in a three-dimensional array where the first channel represents the color channels, e.g. [channels][rows][cols].
Some image processing and deep learning libraries prefer channels first ordering, and some prefer channels last. As such, it is important to be familiar with the two approaches to representing images.
Want Results with Deep Learning for Computer Vision?
Take my free 7-day email crash course now (with sample code).
Click to sign-up and also get a free PDF Ebook version of the course.
Download Your FREE Mini-Course
Manipulating Image Channels
You may need to change or manipulate the image channels or channel ordering.
This can be achieved easily using the NumPy python library.
Let’s look at some examples.
In this tutorial, we will use a photograph taken by Larry Koester, some rights reserved, of the Phillip Island Penguin Parade.
Phillip Island Penguin Parade Photo by Larry Koester, some rights reserved.
Download the image and place it in your current working directory with the filename “penguin_parade.jpg“.
Download Photo (penguin_parade.jpg)
The code examples in this tutorials assume that the Pillow library is installed.
How to Add a Channel to a Grayscale Image
Grayscale images are loaded as a two-dimensional array.
Before they can be used for modeling, you may have to add an explicit channel dimension to the image. This does not add new data; instead, it changes the array data structure to have an additional third axis with one dimension to hold the grayscale pixel values.
For example, a grayscale image with the dimensions [rows][cols] can be changed to [rows][cols][channels] or [channels][rows][cols] where the new [channels] axis has one dimension.
This can be achieved using the expand_dims() NumPy function. The “axis” argument allows you to specify where the new dimension will be added to the first, e.g. first for channels first or last for channels last.
The example below loads the Penguin Parade photograph using the Pillow library as a grayscale image and demonstrates how to add a channel dimension.
# example of expanding dimensions from numpy import expand_dims from numpy import asarray from PIL import Image # load the image img = Image.open('penguin_arade.jpg') # convert the image to grayscale img = img.convert(mode='L') # convert to numpy array data = asarray(img) print(data.shape) # add channels first data_first = expand_dims(data, axis=0) print(data_first.shape) # add channels first data_last = expand_dims(data, axis=2) print(data_last.shape)
Running the example first loads the photograph using the Pillow library, then converts it to a grayscale image.
The image object is converted to a NumPy array and we confirm the shape of the array is two dimensional, specifically (424, 640).
The expand_dims() function is then used to add a channel via axis=0 to the front of the array and the change is confirmed with the shape (1, 424, 640). The same function is then used to add a channel to the end or third dimension of the array with axis=2 and the change is confirmed with the shape (424, 640, 1).
(424, 640) (1, 424, 640) (424, 640, 1)
Another popular alternative to expanding the dimensions of an array is to use the reshape() NumPy function and specify a tuple with the new shape; for example:
data = data.reshape((424, 640, 1))
How to Change Image Channel Ordering
After a color image is loaded as a three-dimensional array, the channel ordering can be changed.
This can be achieved using the moveaxis() NumPy function. It allows you to specify the index of the source axis and the destination axis.
This function can be used to change an array in channel last format such, as [rows][cols][channels] to channels first format, such as [channels][rows][cols], or the reverse.
The example below loads the Penguin Parade photograph in channel last format and uses the moveaxis() function change it to channels first format.
# change image from channels last to channels first format from numpy import moveaxis from numpy import asarray from PIL import Image # load the color image img = Image.open('penguin_arade.jpg') # convert to numpy array data = asarray(img) print(data.shape) # change channels last to channels first format data = moveaxis(data, 2, 0) print(data.shape) # change channels first to channels last format data = moveaxis(data, 0, 2) print(data.shape)
Running the example first loads the photograph using the Pillow library and converts it to a NumPy array confirming that the image was loaded in channels last format with the shape (424, 640, 3).
The moveaxis() function is then used to move the channels axis from position 2 to position 0 and the result is confirmed showing channels first format (3, 424, 640). This is then reversed, moving the channels in position 0 to position 2 again.
(424, 640, 3) (3, 424, 640) (424, 640, 3)
Keras Channel Ordering
The Keras deep learning library is agnostic to how you wish to represent images in either channel first or last format, but the preference must be specified and adhered to when using the library.
Keras wraps a number of mathematical libraries, and each has a preferred channel ordering. The three main libraries that Keras may wrap and their preferred channel ordering are listed below:
TensorFlow: Channels last order.
Theano: Channels first order.
CNTK: Channels last order.
By default, Keras is configured to use TensorFlow and the channel ordering is also by default channels last. You can use either channel ordering with any library and the Keras library.
Some libraries claim that the preferred channel ordering can result in a large difference in performance. For example, use of the MXNet mathematical library as the backend for Keras recommends using the channels first ordering for better performance.
We strongly recommend changing the image_data_format to channels_first. MXNet is significantly faster on channels_first data.
— Performance Tuning Keras with MXNet Backend, Apache MXNet
Default Channel Ordering
The library and preferred channel ordering are listed in the Keras configuration file, stored in your home directory under ~/.keras/keras.json.
The preferred channel ordering is stored in the “image_data_format” configuration setting and can be set as either “channels_last” or “channels_first“.
For example, below is the contents of a keras.json configuration file. In it, you can see that the system is configured to use tensorflow and channels_last order.
{ "image_data_format": "channels_last", "backend": "tensorflow", "epsilon": 1e-07, "floatx": "float32" }
Based on your preferred channel ordering, you will have to prepare your image data to match the preferred ordering.
Specifically, this will include tasks such as:
Resizing or expanding the dimensions of any training, validation, and test data to meet the expectation.
Specifying the expected input shape of samples when defining models (e.g. input_shape=(28, 28, 1)).
Model-Specific Channel Ordering
In addition, those neural network layers that are designed to work with images, such as Conv2D, also provide an argument called “data_format” that allows you to specify the channel ordering. For example:
... model.add(Conv2D(..., data_format='channels_first'))
By default, this will use the preferred ordering specified in the “image_data_format” value of the Keras configuration file. Nevertheless, you can change the channel order for a given model, and in turn, the datasets and input shape would also have to be changed to use the new channel ordering for the model.
This can be useful when loading a model used for transfer learning that has a channel ordering different to your preferred channel ordering.
Query Channel Ordering
You can confirm your current preferred channel ordering by printing the result of the image_data_format() function. The example below demonstrates.
# show preferred channel order from keras import backend print(backend.image_data_format())
Running the example prints your preferred channel ordering as configured in your Keras configuration file. In this case, the channels last format is used.
channels_last
Accessing this property can be helpful if you want to automatically construct models or prepare data differently depending on the systems preferred channel ordering; for example:
if backend.image_data_format() == 'channels_last': ... else: ...
Force Channel Ordering
Finally, the channel ordering can be forced for a specific program.
This can be achieved by calling the set_image_dim_ordering() function on the Keras backend to either ‘th‘ (theano) for channel-first ordering, or ‘tf‘ (tensorflow) for channel-last ordering.
This can be useful if you want a program or model to operate consistently regardless of Keras default channel ordering configuration.
# force a channel ordering from keras import backend # force channels-first ordering backend.set_image_dim_ordering('th') print(backend.image_data_format()) # force channels-last ordering backend.set_image_dim_ordering('tf') print(backend.image_data_format())
Running the example first forces channels-first ordering, then channels-last ordering, confirming each configuration by printing the channel ordering mode after the change.
channels_first channels_last
Further Reading
This section provides more resources on the topic if you are looking to go deeper.
Pillow Python library
numpy.expand_dims API
numpy.reshape API
numpy.moveaxis API
Keras Backend API
Keras Convolutional Layers API
Summary
In this tutorial, you discovered channel ordering formats, how to prepare and manipulate image data to meet formats, and how to configure the Keras deep learning library for different channel orderings.
Specifically, you learned:
The three-dimensional array structure of images and the channels first and channels last array formats.
How to add a channels dimension and how to convert images between the channel formats.
How the Keras deep learning library manages a preferred channel ordering and how to change and query this preference.
Do you have any questions? Ask your questions in the comments below and I will do my best to answer.
The post A Gentle Introduction to Channels First and Channels Last Image Formats for Deep Learning appeared first on Machine Learning Mastery.
Machine Learning Mastery published first on Machine Learning Mastery
0 notes